All posts by Shannon

Here Are Some Interesting Facts About The Show “Home Improvement”!

Home Improvement is one of the most beloved television shows for sure. Everyone was obsessed with the famous line from the show ‘IT’S TOOL TIME!’ Home Improvement was definitely one of the top tv shows that launched multiple careers like Tim Allen’s back in the 90s. He became a household name after the show and was everyone favorite guy. It is unbelievable to see that the was first aired 25 years ago. Tim “the toolman” Taylor had been watched by millions of fans for over 8 years. It was like this show came to the rescue for people who wanted to remodel their windows and their homes, to help repair their house, with a clever show within a show. With his very sarcastic wife Jill, his chill partner in crime Al, and the secretive neighbor Wilson, the show captivated audience all over the country. Many untold tales have been in the midst of this ABC sitcom, and the ones about Jonathan Taylor Thomas are exceptionally shocking! Read on and find out!

Pamela Anderson’s Career Was Launched

home improvement
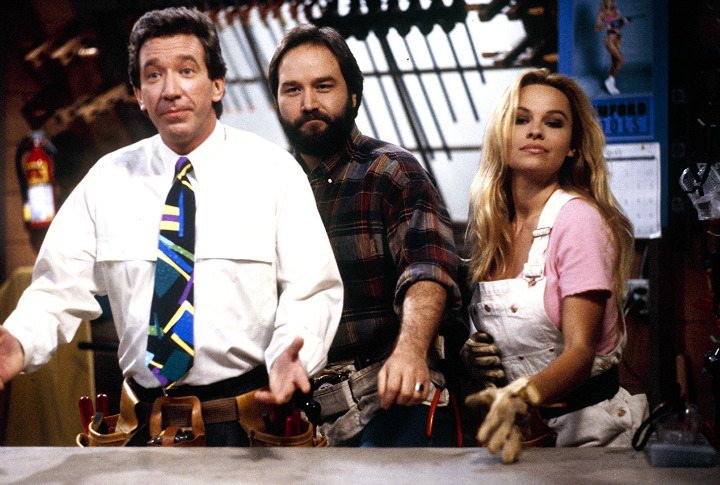
This top rated television show gave the model her big break as an actress when the producers cast her as  the Tool Time girl, Lisa. Pamela had recently become the Playboy cover girl and was the Playmate of the Month so it was not such a hard decision for the already established model to get the job. It was obvious that she would be the perfect fit as the gorgeous co-worker at Tim Taylor’s Tool Time show! Pamela went on to star in 2 seasons of this show before she starred in Baywatch as C. J. Parker. She played the role of a paramedic on Baywatch and it was definitely one of the biggest highlights of her acting career. Pamela Anderson decided to join the Home Improvement cast again to reprise the role of her character on season 6’s finale, The Kiss and the Kiss-off in 1997. Obviously, fans were thrilled to have her back.

Debbe Dunning Took Pamela Anderson’s Place

After just 2 seasons starring in the hit show, Pamela Anderson decided it was time to go. So then her role fell upon the actress Debbie Dunning who was later cast as the new Tool Time girl by the name of Heidi Keppert. The actress would open the show and become Tim and Al’s assistant for a long 6 seasons. She starred in her first episode in Maybe Baby in the show’s 3rd season 3 where the audience were quite positive in receiving the second Tool Time girl. Debbie did not have a huge part in the show when she first started off. It was a minor role she was given but as the show went on she was considered part of the main cast in the last 2 seasons. The producers made this decision after finding out that her character was beloved just as much as the first Tool Time girl Pamela Anderson.

Ashley Judd Was Rejected

Even before Pamela Anderson was selected to play the role of the Tool Time girl, there was another actress who caught the attention of the creators. Actress Ashley Judd was actually considered to play the Tool Time girl because Matt Williams, who is one of the creators of Home Improvement absolutely loved her audition. In the end, she was not selected because it was a unanimous decision where they all felt like her talent was too special to play such a minor role. He was even quoted as  saying, “I called her agent and told him that she was so good, we would find a way to incorporate her into the series, period.” After all of this, the creators offered her the roles as Tim’s sister which they wrote just for her but then Judd decided to reject the offer. Her agents responded by saying the Judd was “not ready to go into television right now. She thinks she has a feature career.”

Tim Allen Declined Turner And Hooch And Dead Poets Societyhome improvement

Even before one of the best 90s TV shows Home Improvement was even though about, Disney executives offered Tim Allen the chance to star in two TV versions of Turner and Hooch and Dead Poets Society. Although these roles sounded very compelling there was something that held Tim from taking up these roles for himself. But ultimately Tim declined both of these roles as he felt that the two of them were both “preparing for failure.” But then he decided to get his own TV show that would be a Disney production on the ABC network. Then soon, the creator of another hit television show Roseanne, Matt Williams was hired to d the job! As we all know all the waiting and patience paid off as Home Improvement went on to become one of the longest and most beloved tv shows in the 90s. Do you think Tim helped at all in eradicating ridiculous contractor insurance for the viewers?

Frances Fisher, The Original Jill

The pilot episode for the show Home Improvement was shot in the month of April back in 1991. During this time there was no Patricia Richardson to play the role of Jill in the show. Frances Fisher was, in fact, the actual first choice to play Tim’s wife, Jill Taylor. The creators of the show soon found out that the audience was not really responding well to the actress as she was not humorous enough for the comedy show. Her talent as an actress was not so strong to be on a comedy-centric show. As we all know, this famous actress has played the roles of  Ruth DeWitt Bukater in Titanic or Strawberry Alice in Unforgiven. Most of her characters on screen have been so serious that the public could not wrap their heads around the fact that she was in this show that needed flawless comedic execution. So ultimately she had to be replaced. They wanted Fisher to loosen up a bit but became unsuccessful so eventually the role of Jill had to be recast.

Allen Could Only Wear Michigan  School Clothes

Tim Allen had been born in the state of Colorado but then they eventually moved to Michigan. While most of us would consider our the state where we were born as our home state, it was not the same case for Tim Allen. He has been known to state that he considers Michigan to be his home state. Hence, on Home improvement, Tim’s character can always be seen wearing shirts that are from schools in that very state. There was a law on the show that only the colleges and universities from the state of Michigan would get the free advertising. The shirts and sweaters that he wore were all sent to the studio by the universities and colleges themselves. It would be safe to say that Tim is indeed a true patriot who would do anything for his home state. Do you think these colleges had more candidates during the time the show aired?

The Original Name Of The Show Was Hammer Time

When the first pilot episode was shot where Fisher was still the actress for Jill, the show was called Hammer Time. This was supposedly an ode to the great entertainer, MC Hammer’s catchphrase. We all know how big MC Hammer was during the 90s so it was not a surprise to see that the producers tried to make use of one of his lines to kickstart the show. This was also planned out to be the name of Tim Allen’s character’s show on Home Improvement. Tim Allen,  Carmen Finestra, David McFadzean and Matt Williams then met up and brainstormed, exchanging their ideas back in 1990 and eventually after a year, they made the decision to change the name. The actual idea behind the name was to symbolize fixing problems in our own houses with the family and even the house itself.

Allen’s Michigan Jersey Had One Accident

On one episode back in 1996 titled “Al’s Video,” there was one scene where Tim was seen rocking a Wofford College sweatshirt. As Wofford is one college in Spartanburg, located in South Carolina, there was a big confusion on the show because it had a rule that only allowed the use of Michigan jerseys but here Tim Allen was, wearing another state jersey. It was the fault of the costume department supervisor who approved of the clothes being worn by Tim’s character. Valerie Levin-Cooper, who is the costume supervisor for the show later revealed that “Someone is supposed to double-check and verify the school is in Michigan. Obviously, someone didn’t do their job. Wofford got lucky.” We are quite sure that someone lost their job that they as the rules were very clear from the very beginning. Or maybe one of the staff members were from South Carolina and they wanted to lay a prank.

Allen’s Stand Up Inspired Home Improvement

At the age of 25 years, Tim Allen had been busted for trying to see cocaine to an undercover cop who obviously arrested him. Tim had to wait 8 months before his official sentence for two years in federal prison was announced. After this incident, he started his career as a stand-up comedian in a Detroit club, the Comedy Castle. Since his comedic chops are impressive, it was not long for Tim to get a little amount of popularity. Soon his patience and hard-work paid off as he could finally work doing stand-up comedy, becoming a regular at The Comedy Store in LA. Walt Disney Co. Chairman Michael Eisner and Walt Disney Studios Chairman Jeffrey Katzenberg went to see him once and were so impressed, they decided to give Tim more options. The rest, as they say, was history.

Stephen Tobolowsky Played The First Al

There was another famous actor who had been a Home Improvement alumni. Stephen Tobolowsky was actually the first choice to co-host Tool Time alongside Tim on the show. His character was called Glen. But sadly due to the fact that during the time of the shooting of the pilot episode, the actor had already had prior commitment to a movie production. Although the producers were all in favor of him starring in the show, they had to get another actor to fill up his absence. So soon, Richard Karn was picked to play the role of Al until Tobolowsky was available. Unfortunately, Stephen had to drop out because of his busy schedule that had movie roles that he wanted to play rather than star in a television show. He later stated that he did not regret his decision to decline Home Improvement,saying, “It turned out to be a very good choice for me.”

Wilson’s Full Name: Wilson W. Wilson

There was one joke that had been running in the hit show for all of the seasons. It was that there was never a revelation regarding the face of Tim’s neighbor, Wilson. The only time the audience ever gets to see him is when he appears showing only the top of his head and eyes. Earl Hindman is the actor behind the character Wilson. He did not mind taking up a role which would disable him from ever showing his face! The only thing we knew about him was that his name was Wilson, that would often spread his immaculate wisdom to family members when they needed it most. In the show, he is only referred to by his first name Wilson. Producers have revealed later that his real name is actually Wilson W. Wilson. So now we can say that we all know his full name although it does not change anything about his mystery much.

Using The Same Studio Audience

Home Improvement is a brilliant show that had a show within the show where Tim Taylor played the role of a host of the show, Tool Time. In every episode, there would always be a section that was unique from all other shows at that time. The tv viewers could see Tool Time’s studio audience and Tim made a point to interact with them as the show went on. It was later revealed that the audience that plays the role of the studio audience for Toot Time, was actually the audience that came for the tapings of Home Improvement! It was indeed a very special bond that the audience and the show had. Allen would also entertain this audience as he was also known to use some “off-color language” and improv. All this fell as a charm for the viewers at home that were all glued to watch Home Improvement at home.

Tool Time Was Inspired By This Old House

The format of the show Tool Time would be awfully familiar to those people who love to watch home improvement shows. The Tool Time show was meant to be a mock show about the PBS home-improvement show called This Old House. The characters of both Tim and Al were originally written to emulate Bob Vila, who was the show’s host and Norm Abram, who takes charge as the master carpenter on the show. Al’s character would also wear plaid shirts and had a full beard, that was no doubt inspired by Abram. Bob Vila appeared as a guest star on Home Improvement multiple times and Allen and Anderson were guests on his show! It is great to know that both the shows did not clash but rather worked in collaboration with one another that certainly helped raise both ratings of their shows.

The Great Race Took Great Effort

As we all know, all of these sitcoms are not that easy to execute. Many of the shows we watch on our television screens on even the shows online take up a great deal of work to be shown on screen. Such was the case for an episode of Home Improvement that ended being a very challenging task. On one particular episode where Bob Vila appeared, there was so much work that needed to be done. It was one from the two-part episode titled “The Great Race II” in the 3rd season, that was also a part of the two-part episode “The Great Race” on the 2nd season. In this episode, Tim challenges Vila to a hot rod race, instead of a lawn mowing competition. This episode was especially challenging because the producers needed to shut down the Burbank Airport runway to film the iconic scene.

 Reason Behind John Bedford Lloyd Quitting

The show has had a lot of actors come and go as it has run for a long time. So when the actor John Bedford Lloyd auditioned for a part in Home Improvement, there were two roles he was considered for. The producers wanted him to play both the role of Tim’s Tool Time assistant and his mysterious neighbor, Wilson.  The actor made a decision which he would soon regret. He decided on the latter character as there was no prior information about what he would have to do as the character on the show. He was in for a disappointing surprise when he discovered the fact that his character Wilson would always hide behind a fence throughout the whole show. So it was evident that he did not want to play the role, so he dropped out. Lloyd had only given a one day’s notice just before the pilot episode was supposed to be filmed. The producers had to find a quick replacement for Earl Hindman to play Wilson on Home Improvement.

Richard Karn’s Role After Traffic School

There were a lot of mysterious ways in which the actors for this incredible show were cast to play each of their roles. Richard Karn was rolling a stop sign which in turn ended up in him receiving a ticket. This happened soon after he had his Macbeth rehearsal in the city of Los Angeles. Because of his unfortunate traffic episode, he was ordered to join traffic school. While he was there at the traffic school, he happened to meet an agent who talked to him about a new show in the works called Home Improvement. Karn felt like he would have a good chance after his audition due to the fact that he was well acquainted with several of the people involved in the show. Although his role was initially written as a temporary one, he would get to star in all of the 8 seasons of the show!

Allen’s Childhood Neighbor Was The Inspiration

As we all know, Tim Allen is now known for coming up with some of the weirdest characters on his stand-up comedy shows. Even in the case of Wilson, he drew inspiration from the people of his own personal life. Wilson was actually based off of Tim Allen’s childhood neighbor. He had a neighbor who he would often strike up conversations with as a child. However, since he was too little, he could never manage to get a look at his neighbor’s face. So Allen decided to use this idea in creating a character who is always interactive with the main characters but whose face will never be seen on screen! We all know that it is quite common for mysterious characters to exist on shows where they never reveal the faces but most of these shows happen to be animated.

The Final Episode’s Big Reveal

Since no one had never seen the face of Wilson the neighbor in all of the episodes, there was a growing curiosity among the viewers. So, it was high time when on the 8th season, on the 204th episode, Wilson’s face made a surprising revelation for the whole audience to see. Also, on the final episode of the whole show, on May 25th, 1999, Earl Hindman revealed himself after the curtain call, showing the world who Wilson actually was. Wilson’s character was no doubt loved by the viewers so much so that he was ranked #6 of the best-unseen TV characters of all time. Home Improvement’s final episode became the fifth highest-rated series finale among all the shows during the 1990s and 9th of all time! It is truly an incredible achievement that proves the show’s worth and the appreciation it receives from viewers.

Home Improvement Video Game

There is another fact that proves how popular the show was during its time. While most shows bank on merchandises and goodies that have been created under the show’s theme, Home Improvement has a very different approach in branching out. In the month of November in 1994, Super Nintendo Entertainment released a 2D action platformer video game called Home Improvement: Power Tool Pursuit!. The main plot of the fame was that Tim’s new Binford ultra power tool line goes missing and the player has to locate the missing tool. This game included 4 worlds with 4 levels each where the player had to fight their way through soundstages. The video game was voted the #5 worst game based on a TV series. It goes to show that just because something works as a television, it does not mean that it would necessarily work as a video game.

Tim’s Phone Number Showed Illinois Area Code

There was an ongoing joke on the show. During many episodes of the show Tool Time, Tim would often blurt out very offensive words that were mostly directed towards women. If ever this happened, Al would come to the rescue by holding up a cue card the contained either Tim’s mailing address or phone number. He would take it up a notch by telling the viewers that they could also send some hate mail if ever they feel like it. The address that they showed was actually the location of the studio in Detroit, Michigan, with the phone number (815) 555-TOOL. The code that they have shown was actually for the Northern Illinois area but not Michigan… Do you think that the show received any actual hate mails or do you think it received mostly fan mails that were sent to Tim Allen?

Jonathan Taylor Thomas Quits The Show

On season 8 we watched Randy Taylor leave for Costa Rica for his environmental studies in the 1998 episode, Adios. This was actually because Taylor wanted to pursue his studies in real life which Tim Allen was not so pleased about. In one interview he even said, “He said it was about going to school, but then he did some films,” so his reasons were not legitimate. Thomas did not reprise his role in the later season but did come back for the reunion episode, “Home for the holidays.”

Reuniting On Last Man Standing

December 8, 1998, marks the last time Tim and Taylor were seen on screen together. They were not on speaking terms as Tim was displeased by the fact that Thomas still made films during his “time off.” 15 years went by and soon we saw them together at his former TV dad’s show, Last Man Standing. Thomas plays the middlechild on the show where he often says, “A lot of times, that middle child ends up being the funny one becomes he wants the attention.” 

Refusing Season 9

As the 8th season wrapped up, the producers were keen on creating the 9th season. They even offered Tim Allen $50 million for another season with his co-star, Patricia Richardson who was also offered half of that. Both the actors rejected this offer. Richardson was also very disappointed with the half payment bit of the offer. Richardson was a guest star on  Last Man Standing with Allen. SO we can say that they did have a reunion after all.

Inspired A Movie

The producers were on the move to make a film that was based on the show as it proved to be such a hit. The plot of the movie would be that Jill and Tim got a divorce and he could only get to his family if he cross-dressed as a nanny. This idea sounds very familiar because it does exist in the movie world. There is, in fact, a show that has the exact same plot.  Robin William’s movie, Mrs. Doubtfire was inspired by this storyline where the directors clearly did not make much change.

Binford Company Was Inspired By A School Friend

In the storyline of the show, Tim’s character was a salesman for a company, Binford. The company sponsored the show Tool Time and the logo appears on all of the shows’ episodes as it was where they got their tools from. The whole name and logo of this company were inspired by a school friend of one of the screenwriters. Binford later ranked #10 on the list of fictional brands on TV!

Allen’s And Taylor’s Disney Characters Have Jokes

On the episode, “I was a teenage Taylor,” the episode showed several pranks that were played on the family members. In one scene, Randy distributes candies to two kids that were dressed as Simba and Buzz Lightyear. He even said, “One for the spaceman, and seven for the cute little lion.”  Tim Allen was the voice behind Buzz Lightyear in Toy Story and Jonathan Taylor Thomas was actually the voice of Simba in The Lion King.

Toy’s Story And Home Improvement In The Same Universe?

There is a theory that Toy Story and Home Improvement occur in the same universe. Fans were quick to point out that in a particular scene Woody is seen trapped under a Binford toolbox. To add to the speculation, there was one episode on Home Improvement, Tim literally states, “I am Buzz Lightyear,” which adds to the theory as he voiced the character in the animation. Who knows, maybe Tim quit hosting Tool Time to become a spaceman!

Is Tim Allen Jesus?

On very weird fan theory follows Home Improvement. There are many people who believe that Tim Allen is Jesus. This originated from a Reddit user who first pointed this out. Tim is like Jesus as he is also a carpenter who often receives advice from a mysterious neighbor. Tim not only receives wisdom from his neighbor but also teacher his viewers to other people/ his audience. This makes Wilson God-like, while Tim would be Jesus. This is highly possible if you think about it.

Michele Williams’ First Time On TV

Michele Williams’ first time ever on TV was when she appeared on one episode of Home Improvement back in 1995. She appeared on the 4th episode titled “Wilson’s girlfriend”.  She took on the roles as Jessica Lutz, a girl Brad goes on a date with. Williams was 15 during that time and had not made a name for herself. 3 years later, after starring as Jen Lindley on Dawson’s Creek, she became a household name who is now one of the top rated actresses in Hollywood.

Randy Was Older Than Brad

On the beloved tv show, Jill and Tim had three boys, Brad, Randy, and Mark. Among the siblings, Brad was eldest. But it is quite surprising to find out that Jonathan Taylor Thomas (Randy) was actually older than Zachery Ty Bryan(Brad)! His birthday was on September 8, 1981, which was a month prior to Bryan’s birthday! They were actually studying in the same grade. Taran Noah Smith played Taylor, who was 3 years younger to his brothers on-set.

Source

http://blog.newsd.co/interesting-facts-show-home-improvement/

Tips to Select the Best Contractor for Your Home Improvement Project

Getting work done on your home is a very crucial endeavor. Whether you’re looking to put the property up for sale or making modifications for your own comfort, it’s something that you’ll want only a qualified contractor to handle. The reasons are clear: A shoddy job will simply not look as good as it should, but even worse; it could be dangerous to you and your family.

Sifting through all the contractors in the phonebook or online might seem very daunting at first, but here are a few tips that can help you make the right selection conveniently:

1. Explore Your Network – Your family and friends are the best place to start, since people whom you know will likely have employed the services of contractors for similar projects. It is the quickest way to get someone reliable since you’ll be depending on the endorsement of someone with an incentive to make sure you get the best. Be sure to ask them for details so you can know what to expect in terms of quality of work as well as customer service.

2. Check out Their Office – While there are certainly some contractors who do not have office space but are still of good quality, it is always a good rule of thumb that companies which take the pains to set up physical offices as well as are more likely to be reliable than those which do not. Apart from that, a showroom or office will give you an opportunity to see home improvement products and get a clear picture of how they’ll look in your home.

3. Liability Insurance – A could go wrong in the course of a home improvement project, and if your contractor does not have liability insurance, it could leave you in a lurch. Ask any company you’re considering if they do, and if you have any doubts, ask to see proof. It’s better to risk some awkwardness at the initial stages than a full-blown meltdown if things go badly.

– Working with a contractor that offers a broad range of services will be much more convenient for you in the long run. Instead of having to deal with an architect and a separate contractor for every aspect of the project, a full-service remodeling company can handle the work from start to finish. Some contractors even handle the processes involved in getting permits from the authorities where your project is located.

5. Quality over Cost – As with every purchase, it’s very easy to get tunnel vision and focus solely on the costs alone. That would be a very bad approach here because cheapness is often indicative of lower quality materials or less expertise. Of course, that doesn’t mean that you should automatically go for the highest bidder or that you shouldn’t to get the best price possible.

Source

http://realtytimes.com/advicefromtheexpert/item/1015770-tips-to-select-the-best-contractor-for-your-home-improvement-project

Best Miter Saws for Home Improvement

A miter saw also referred to as bench miter saw can be defined as the improved forms of the saws which are essential for providing a much better and accurate miter angle cut. They are equipped with the pivoting arm which enables the user to be able to tip the blade of the saw to the slide hence providing a bevel cut.

There are different types of miter saws on the market, and the following proved to be the best for home use.

Kobalt 7-1/4-in Sliding Compound Miter Saw

With less than 200 dollars, you can quickly acquire this excellent device for excellent woodwork at your home. The saw is crafted with high-quality features that make it easy to work with and reliable as well. First off, the miter saw consist of vertically mounted laser which guides the user to provide an accurate pre-cutting line for efficient and precise alignment.

Although it may not be ideal for left-handed people, the miter is quite easy to work with since it has lightweight crafting thus enabling one to work fast and easy. The presence of the dual sliding systems which have linear bearings allows one to have a smooth and efficient cut all through.

Ryobi Miter Saw 7-1/4-in Miter Saw

This is a well-crafted miter saw which can be used by both hands. Its lightweight structure enables one to cut fast and comfortable too. The presence of the high-quality blade which a lot of customers have recommended allows one to have an improved and well aligned cut all through. The saw is designed with an edge and clamp which makes it easy and possible to hold the device firmly on the table for a smooth workflow. Aside from the affordable price that this laser is being sold at, it is also equipped a laser which provides excellent viewing to the user on how and where to direct their cut. But for a beginner, get some inspiration guide on how to use a single bevel miter saw with laser guide.

Craftsman Miter Saw

The craftsman saw is just the perfect option for a saw to use by both the beginners and the professional. It is equipped with excellent features such as portability which enables one to have a smooth operation and be able to work with the saw as well. It is powered by a battery thus making it ideal miter saw for movers. Although it has a high powered motor which may drain the power too fast, this is a reliable miter power for everyone. The saw can be used on different surfaces but it works better on a Delta 36-267 Heavy duty foldable miter saw stand.

Chicago Miter Saw

If you need the most affordable and straightforward miter as on the market, then Chicago is just the perfect saw to purchase. Note that even though the saw may cost you less, this does not interfere with its functionality since it provides high-quality services. The miter saw is suitable for general carpentry jobs since it can be used for a variety of tasks such as deck cutting, sliding and also for trimming.

For practical results, you need to have the best, and most quality working tools and miter saw gives you just that. The above reviews are some of the best miters is which are suitable for home use. They are safe and comfortable to work with hence allowing you to have the best woodwork results.

The post Best Miter Saws for Home Improvement appeared first on Handyman tips.

If you find this useful, you will also like:

Kitchen Renovation Ideas For Your Home

Have you been putting off parties and invitations to friends and family because you can’t stand the sight of your kitchen? Well… rejoice. The following are some ideas for kitchen renovation. You can dress up your old, tired kitchen with faucets and other kitchenware–for an easy fix–or tear the whole thing down and start over. It all depends on your budget, your layout, how much time you have, etc.

The Perfect Entertaining Kitchen

If you are a homeowner that has entertainment in mind, a must-have is a standalone island. A little island paradise can be created in a kitchen, provided it has the room. These islands let your guests join you as you prepare the next award-winning culinary creation. They can host a second sink and provide extra workspace. And for parties, they are frequently the focal or gathering point. If your guests do want to interact with you while you are preparing, consider concealing your sinks and other work areas with a multilevel island.

And if you have the space and the budget for it, think about opening up your kitchen to make more room for entertaining, food prep, storage, and every day basic use.

Surfaces That Are User-Friendly

Surfaces that are easy to clean are the best. No matter what your kitchen’s décor, the most popular choices for appliances are still stainless steel. The reason? They resist scratches and stains, yes. But they look good doing it, as well. You’ll have more time to spend with family and friends because cleaning your kitchen will be quick and easy. Germ and dirt busting surfaces like ceramic tile, stone countertops, and stainless steel make keeping your kitchen tidy an absolute breeze.

Give Your Appliances an Upgrade

While we’re on the subject of stainless steel, if your budget allows, it could be time to update those tired, old, energy draining appliances. This can include everything from refrigerators to dishwashers. With today’s technology, you can get some assistance on compiling your grocery list from a newfangled, high-tech refrigerator. And pre-rinsing is a thing of the past with the latest dishwashers.

Even if your budget is a little on the stretched side, consider appliances that are more energy-efficient. You will actually save money in the long run.

Let Your Faucet Take Center Stage

The sink/faucet is the focal point of many a kitchen. And whereas, it may be highly entertaining to play with the spray patterns on today’s contemporary faucets; new touchless faucets serve you well during pre-party activities. How? By freeing up your hands with a modern technology influenced touchless feature. Not only do they help prevent cross-contamination, but they also make every kitchen task a little bit easier. Hands-free technology already exists in other areas – why not in your kitchen?

Even if you haven’t put off inviting people over because of your kitchen, renovation is still something to consider. A new, high-tech kitchen will increase the value of your home immeasurably. It’s a win-win situation. You’ll love living and creating in your amazing kitchen. But, when you’re ready, you will get more money for your home when you sell (thanks to that fabulous kitchen renovation).

Source

http://www.discountbathroomvanities.com/blog/kitchen-ware/kitchen-renovation-ideas-for-your-home/

How to Build Sturdy Garage Shelves « Home Improvement Stack Exchange Blog

I’ve done some finish carpentry in the past, but I’m really more of a framer because I like to just throw things together quickly and make them as strong as possible. With garage shelves, in my opinion, they don’t need to look fancy, but they do need to be sturdy – I’ve seen far too many saggy garage shelves that look like they’re going to come tumbling down at any moment. In fact, I’ve actually had a pet killed by some pre-built garage shelves that collapsed.

I recently built some new garage shelves in the home we have been living in for a couple years now. I had always planned to build some, but only got around to it a few months ago. I wanted to share my experience to give other DIY-ers an idea of a simple shelving design that is built to last. The pictures in this post are only of one of the walls I built shelves on. The total cost for wood, nails and screws for both walls was just under $200.00. My goal was to build the strongest shelves as possible, without spending too much money. For the amount of sturdy shelf space we now have in our garage, $200.00 was well worth it.

Tools Needed:

  • Hammer and nails (preferably a nail gun if you have one)
  • Screws and a screw gun. I used 3 ½ inch wood screws.
  • Some kind of saw. a chop saw would be best for this, but technically you could use a skill saw, a jigsaw, a table saw, or even a hack saw if you had to.
  • Tape measure
  • Stud finder
  • Long level (at least 4 feet)
  • Pencil
  • Small ladder
  • Chisel (if you have baseboard in your garage)

Prep Work

Measuring

  • Know what you’re going to store on the shelves and their dimensions. Once you know the height of the tallest item you plan on storing on the shelves,
  • Measure the distance between the floor and the ceiling. Divide this distance by the height of the tallest item you will be keeping on your shelves. For example, if you have a cooler that is 20 inches tall, and the distance from your ceiling to your floor is 108 inches tall, you would divide 108 by 24 1/2 (I’ll explain why it needs to be 4 ½ inches taller than your tallest item later). This would equal roughly 4.4, which means that you have enough room for 4 rows of shelving with 21 inches of usable height.

Obviously you don’t have to make all the shelves be the same height, but make sure to have at least one of two rows of shelving tall enough for all of your tallest items. I made our bottom two shelves taller to hold the larger, heavier items (like food storage), and made the upper shelves a little bit shorter to hold the smaller, lighter items. I would also recommend storing all of your DIY chemicals like herbicides, pesticides, or cleaners on the top shelf, so your children cannot reach them (easily…).

Finding and Marking the Studs

  • You will need a stud finder for this part. What I did was mark all the vertical and horizontal lines that my shelves would follow. Take your stud finder across the wall horizontally (twice), once up higher, and once down lower and mark each stud. Then take a 4 ft (or longer) level and trace a straight vertical line between the upper and lower marks. Use that line to extend the vertical line all the way up the wall. This vertical line will be your guide to help you see where to screw the boards to the wall.
  • Next draw the horizontal lines by measuring from the ground up. If your bottom shelf will have a 21 inch space under it, measure up 24 ½ inches and use your level to draw a horizontal line all the way across the wall. The next horizontal line should be 24 ½ inches above that line (assuming all of your shelves will be the same height). The reason you have to go up 24 1/2 inches to build a 21 inch space is because you have to account for the 1/2 inch plywood on top, and the 3 inch tall  frame board.

Calculating Amount of Wood Needed

  • The wall I built these shelves on was about 14 feet long, so I needed two 8 foot sheets of plywood for each row. I had to cut off the extra two feet with my chop saw.
  • Once you know the length of the wall, it’s fairly straightforward as far as counting up how many 2x3s and sheets of plywood you need. For a 14 foot wall, I used 5 2×4 vertical posts, two on the end and three in the middle, each spaced about 3 ½ feet apart. You can do whatever you want here, but make sure you don’t go too far between the posts so you have enough strength.

Building the Shelves

Once you have all of your lumber, it’s time to start building. This is the fun part and if you’ve already measured and marked everything, the building portion should go fairly quickly (with this design).

  • The first step is to tack the 2x3s to the wall. Place them over the horizontal lines you drew and put a nail in at each vertical line (where the studs are). I used both screws and nails for this part. Screws offer the horizontal strength, and nails provide the vertical strength.

As you can see in the picture below, I also used the perpendicular wall for increased support. I would recommend this as it provides horizontal strength.

  • After screwing and nailing the boards up on to the wall, you can put up the end boards (2x4s). Measure and cut these boards (and all the other vertical support 2x4s) to be ½ inch taller than the highest board against the wall. This is so that when you lay the plywood down on the top shelf it will fit into the frame for additional support.
  • The next step is to put up the outer 2×3 boards on each row. Start at the bottom and place something under one end, while you nail the other end to the perpendicular board that is against the wall. Replace whatever you were using to support the other end with the first vertical support 2×4. Nail it into place with only one nail so you can still pivot the board side to side and level it. See image below.
  • Continue moving across, putting the next horizontal 2×3 into place and nailing the next vertical 2×4 to it.
  • Repeat this process with the next row up, but before you nail the vertical 2×4 to the second row, make sure to level it vertically with your long level. After you have leveled the 2×4 and nailed it to the second row, the remaining rows will go quickly. I would still check each row with the level as some boards can be warped and will need to be bent into place.

It’s a little difficult to see in these pictures, but I have also tacked in some support boards between the horizontal beams, coming out perpendicular to the main wall.

The final step is to lay in the plywood pieces. They should fit right into your frame and once nailed down will offer additional strength coming out of the wall, as well as side to side. I nailed them down roughly every 12 inches.

As you can see in the picture below, your garage shelves should be strong enough to double as a jungle gym for your kids!

Filed under ProjectsTips and Tricks

Tagged: , , ,

Source

https://diy.blogoverflow.com/2013/03/how-to-build-sturdy-garage-shelves/

Tiling a Fireplace Surround « Home Improvement Stack Exchange Blog

THE SETTING

Our 1869 foursquare farmhouse had been renovated around 1905 to make it more “upscale and modern”. The front and back parlors were joined and a fireplace was installed.  In 1999, the house again got a makeover, with new beams, plumbing, wiring, but maintaining much of the molding, windows, and style from the turn of the 20th century.

The fireplace now consisted of a painted wooden mantle and trim, with a brick façade around the firebox.  The façade had been painted several times, but seemed fairly sound.  It was now a dull, dark greyish green. Time for a freshening up.

DESIGN

We decided on tile, selecting an arts-and-crafts style that would have been in keeping with early 1900s décor.  The 4 ¼” x 4 ¼” tiles were handmade in California.  We chose field tiles (regular four sided tiles), bullnose tiles (with one sloped finished edge) and a few decorative bulls-eye tiles for accents.  The tiles were about 1/2” thick and slightly irregular, with no built-in spacers.

The layout worked out fortuitously. We wanted wide grout lines, often seen on arts-and-crafts projects.  We also wanted decorative tiles on the inside corners where the vertical and horizontal runs met.

With the moldings closest to the façade removed, and with a careful adjustment of the grout spacing, we were able to get a pattern that gave us two columns wide on the sides and two rows deep on the horizontal section.  We wanted only full tiles between the decorative corners, but the 48″ spacing between the inside edges of the firebox was a bit too wide for 10 tiles, even with 3/8″ grout.  Stretching them out was not an option because the grout lines would be too wide compared to the vertical runs. So we decided to add tiles to the vertical inside edge of the firebox. This narrowed the horizontal opening by about 1½” ( the thickness of two tiles and thinset), down to an overall width of 46 1/2″ .  With just a little fudging of the grout width to a hair more than 3/8” (but not quite ½”), we got a satisfactory fit of ten tiles horizontally between the bulls-eyes.

PREPARATION

Getting ready for the installation, we took a closer look at the brickwork, only to find that it was not.  The sloping angle of some of the “brick” corners should have been a giveaway.  This was actually stucco that had been textured and grooved to look like decorative brick.

As I begin each DIY project around our house, my wife asks “Have you ever done this before?” the unstated, but obvious worry being that I was going to serious wound myself, set the place on fire or cause a giant sinkhole to swallow up our homestead.  My usual answer is a smug, silent look, implying that, beyond question, I am up to the task.  But his time, I actually hadn’t done ceramic tiling before.  Time to start reading, surfing the web, and asking my good old friends on diy.stackexchange.com.

While the paint on the “brick” façade was largely intact, we were a bit unsure about whether the thinset mortar used to mount the tiles would adhere well enough.  A quick post on DIY brought me some great feedback.  Regular contributor HerrBag suggested trying a test patch of thinset on the surface to see how well it adhered.  The test showed fair (not great) adhesion with some paint peeling away and some thinset sticking pretty solidly.

Heavy tiles and some exposure to heat suggested a stronger grip was needed, so we went through a vigorous scraping of the painted surface with a wire brush to remove any loose paint.  Then we did a thorough scarifying of the surface using an angle grinder with an abrasive wheel to cut grooves into the stucco.

You know how they say “preparation is more than half the task”?  Well we didn’t prepare well enough for the hurricane of dust that blew through our entire house.  We had taped and masked the wood of the fireplace and put down newspapers for several feet.  We wore safety goggles, dust mask and gloves.  Nowhere near enough protection!  The grinder threw up clouds of paint and stucco dust, worst in the immediate vicinity, but the film reached upstairs bedrooms!  We have since been cleaning for weeks.  And with old paint there is always the risk of lead contamination.  (Next time, a full plastic tent around a grinding project.)

TILE MOUNTING (Part 1)

Before beginning the actual tile mounting, we put on a skim coat of thinset to level out the variances in the stucco and give a more complete base for the tile.

Now on to the actual installation!  Guided by several books on tiling and an internet sweep, we positioned a support brace at the top edge of the firebox (the bottom edge of the horizontal run).  It was leveled and attached with light duty anchors and screws (it’s only temporary).

After mixing the thinset powder (having been warned away from premixed products) with a drill and mixing paddle, waiting the required slaking time (to fully absorb the water), and remixing, we slathered on the mixture, and then striated it using a notched trowel.  Finally, we began setting the tile, beginning with one of the corner decorative tiles, working across to the opposite decorative tile, using spacers to guide the placement and then tweaking to get even spacing.  Over the firebox, bullnose tiles are used, with the tapered edge facing down.

The row above then followed, finally filling in the area outside of the decorative tile, both using field tiles.  Numerous spacers were used to keep the tiles in position (including additional spacers gently wedged in where additional support or a slightly wider gap was needed).  Tiles are tapped into place with a rubber mallet to seat them firmly.  If precise leveling were needed, a tapping block, several tiles wide would be used under the mallet, but the slight irregularity of the hand-made tiles didn’t call for it.  We wiped off stray thinset from the faces of the tiles (lots on the first few, less as we got better at it).  Step back. Admire. Now go to bed.

TILE MOUNTING (Part 2)

Time to remove the brace and begin the vertical legs.  Same routine with thinset and then to the tiles.  Line up the first row just below the bottom of the upper section, and work your way down.  What? Wait! What’s going on?!?  The tiles are sliding downward!!! Oh, yeah.  Now I remember, the books, the videos said “Start from the bottom, work up”.  Now we see why.  Gravity!

Pull the tiles, scrape off the thinset.  Begin again at the bottom of the leg, with a flat spacer under the edge of the bottom tile, building with tile, spacer, tile, until they meet the upper section.  Adjust the gaps, using spacers as wedges until the gaps are comfortably uniform.  As discussed earlier, the layout resulted in a lucky positioning that didn’t require any tile cutting, a pretty unusual occurrence.  If a partial tile had been needed, it would have been determined in advance, cut with a wetsaw and placed at the bottom.

The tiles on the inside of the vertical legs are bullnose.  They are placed so that the inner edge will line up with the face of the return tiles that will be placed inside the firebox in a later session.  Now do the other leg.  (Is it getting easier or are we getting better?)  Again, time to knock off to let the mortar dry.  But clean up before retiring (uncured thinset comes off oh-so-much easier).

The last tiles to be set are the return tiles inside the front vertical edges of the firebox.  Same routine as the legs, beginning with a spacer, tile, spacer, building from the bottom to the top.  Again, luck (and a little tweaking on grout width) gave us full tiles with no cutting.  Clean up, let dry overnight and pull all spacers.  The tiling is done!  (Not the project, just the tiles).

GROUTING

Next day, grouting begins. Huzzah!  We knew exactly which grout color we wanted – Tobacco!  So warm, so rich.  But let’s mix up an actual sample.  A few tiles on a board, grout around the edge.  Uh, oh.  The tiles are wrapped in fudge!?  OK, the next color lighter, Earth!! Hmm. Still pretty muddy looking.  Five days and four more colors on a sample board led us to the right complement color.  Seeing the grout colors in reality, alongside actual tiles, is much more informative than a color chart.  Given the cost of a tiling project, “wasting” a few tens of dollars on several bags of different colors of grout is a small investment to be sure you get a shade that you like.  And once the grout is installed, it is cast in concrete.

One more step before the actual smear.  The top edge of the upper horizontal row will get a grout line that will show below the upper molding.  To keep that line on the same level as the rest of the grout, we installed a strip of furring level with the surface of the tiles.

Grout mixing and installation is like the books and videos say, but pay attention to the amount prepared at one time. Amateurs (like us) really should limit themselves to a small bucketful.

Mix, let slake, remix and apply.  The pundits vary in their advice about consistency from thinner than mayonnaise (or even soupy) to thick peanut butter.  Because of the wide joints, we leaned toward the stiffer end.  Using a grout float, work it into the channels, scrape off, holding the float at nearly a 90 degree angle and on the diagonal.  It really is a question of practice makes easier, if not perfect.  The nice part is you can go back over the area a few times if the first pass is a bit ragged.

GROUT CLEANUP

Follow the grout’s instructions about waiting before wiping down with a sponge, and then do so gently. Aggressive will just undo the careful joints you have so lovingly created.  You may need to finesse the ends of the joints, especially as they round toward the firebox returns and the decorative corners.

After wiping, wait the designated hours (as instructed on the grout bag, RTMS) to allow a good set before polishing the haze off with a soft cloth.  You can gently tune up the edges of the tiles if the grout is still a bit high, but moisten the rag to avoid digging out too much.

You may need to do the grout process in several stages. It took us three sessions – one for the horizontal field and one for each of the vertical legs and their firebox returns.

With moldings reinstalled, the project is now just waiting for caulk, color-matched to the grout at the base, grout sealing, and the first blazing fire.

Filed under ProjectsUncategorized

Tagged: , , ,

Source

https://diy.blogoverflow.com/2014/02/tiling-a-fireplace-surround/