Category Archives: News

Home Improvement: Choosing Eco-Friendly Contractors

Having an is easier than ever in today’s market. That being said, a lot of companies claim to have the greenest practices only to prove differently when working on a project. If creating a green home is important to you, you’ll need to take responsibility for vetting and choosing companies that are eco-friendly both in marketing and in practice when hiring experts for home improvement projects. Here are some tips for always choosing the most eco-friendly company to help with your projects around the house:

Eco-Friendly vs Eco-Fake

Let’s face it. Sustainability is all the rage right now, which means that lots of contractors are jumping on the to attract new customers. Though many of them claim to implement green initiatives, there are no real regulations for checking this before consumers sign on the dotted line. The truth is that though many companies are taking baby steps to become more environmentally conscious, those steps might mean little in the grand scheme of things. If your contractor claims to be green, ask about what specific changes they have made to be more sustainable. Ask about the materials they use in contracting projects, how they dispose of waste, whether their equipment is rated for energy efficiency, and more. In other words, ask for receipts.

In a perfect world, all contractors would be eco-friendly. Since this dream-world doesn’t exist
yet, it’s up to us as consumers to do our due diligence. Don’t fall victim to a green gimmick!

Spotting Fakes

It’s becoming easier to spot the fakes in light of recent developments about green companies
and their gimmicks. First, do your research. If an eco-friendly promise sounds too good to be true, it probably is. Your first step is actually just learning more about your options for your specific project. Some projects are cleaner than others, and not everything currently has an eco-friendly alternative. Avoid paying more for a bogus eco-friendly option by knowing what’s real and what isn’t, and this will also let you know if your contractor is claiming that your project can’t be done more sustainably when you know there are options available.

Whether you’re researching the right or the right home insulator, avoid companies that use too many buzzwords or come across as sales pitches. These types of companies are trying to profit off recent pushes towards sustainability, and they know how to make people choose them over the competition. Instead, look for genuine understanding on their services pages that show they recognize the environmental impact of their projects. Companies that really value environmental initiatives won’t try to mislead you. When in doubt, follow your gut instinct.

Know When to DIY

Sometimes the best option for a green project might just be to do it yourself. Recognize when you’re able to or improvement on your own terms to ensure it’s done right. There is a wealth of resources available online for DIY projects, and many are easier to do than you might think. If you still have questions, you may want to consider speaking to an expert about the best way to proceed with a project before you get started. And if you decide that you can’t DIY a project, be open with your hired expert about your desire to proceed with the project or repair in an eco-friendly way.

Choosing green is a priority for many homeowners. Unfortunately, a lot of companies want to profit from this movement and might take advantage of well-intentioned homeowners. If you want to make sure you’re truly using the most eco-friendly companies, you need to be prepared to do your research or even do projects yourself if possible. If you use the tips above, you’ll find the best option for your green home.

Source

http://www.greenyourdecor.com/13474/home-improvement-choosing-ecofriendly-contractors/

Guest Bathroom Renovation!

Hey y’all!  Happy Easter to you all!  We are having a family day and seeing both our families for Easter, so it’s a good weekend.

It’s finally time to share the guest bath renovation with all of you and I’m SO excited it’s finally here.

It really did take almost 2 months to complete this space, but it was well worth it for the outcome we got.  We did hire out the tiling job and that was a must, definitely out of our skillset to complete something like that.  I hired the same guy that did my other master bathroom reno, so I’ll share all the details at the bottom of the post.

In case you don’t remember, let’s take a look at this plain and boring guest bathroom before we started.  It looks like a completeley different space now!

This is how it looked when we moved in.  Boring. Beige. Blah!

It does have a little window above the tub, so that lets in some light, which is good.

It certainly had no personality at all.  But it was clean and that goes a long ways too.

I donated the vanity to the local Restore here and hopefully it will get recycled.  We envisioned something a little more stylish for this first floor guest bath. This is the bathroom that anyone who comes to our home will use and it’s right off the small guest room on the main level.

Perfect timing brought about a partnership with Wayfair and the bathroom plans were underway, with this mood board of all the ideas we put together for creating this gorgeous bathroom using Wayfair products.  All the tile, the vanity, light fixture and toilet paper holder came from Wayfair.

I ended up having to buy another faucet locally, since the one I got didn’t have valves attached.  Be sure you are aware of that if you go to update a faucet.  Some faucets are trim kits only and don’t have the valves, which are needed if you’re starting from scratch with a new vanity.

Are you ready for this black, white and gray Guest Bathroom renovation reveal! 

I’ve been dying to share it with you all, so get ready for lots of pictures!

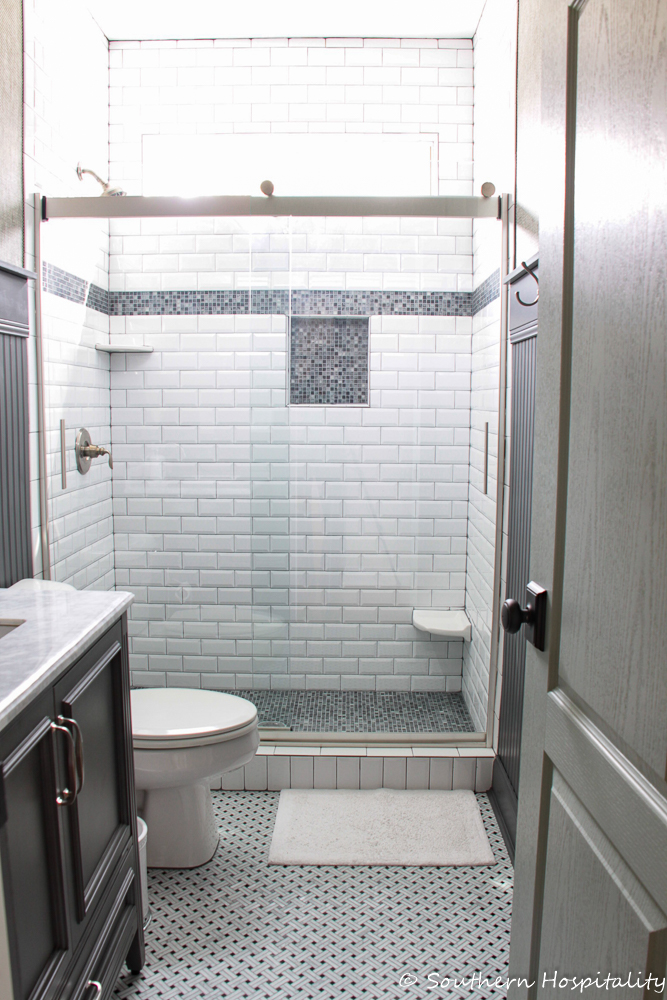
It looks SO completely different now and I can’t get over how pretty it is every time I walk in there.   We had it tiled all the way to the ceiling, so it looks so fresh and clean now.  You’ll notice there’s no color and that’s not really like me, but in small spaces like this, I do like a clean and monotone look and this suits us just fine.  These are color pictures though! Ha!

I took pictures from every angle so bear with me as we look around this small space that is 6′ x 5′ in floor area, not counting inside the newly tiled shower.  As you can see, we took out the old one piece fiberglass bathtub and made this a walk-in tiled shower which I think will be so much better.  I shared the renovation process so take a look at that if you missed it.

Mark (with my help) demo’d the bathroom and that saved us some dollars on this project.  We did as much as we could ourselves to help keep costs down, but I’ll share a recap at the bottom of the post, since I like to know how much things costs in different areas of the country and I’m sure you do too.

My tile guy did a great job in building the new shower floor and all the plumbing that went with that process.  We used a beveled white subway tile on the walls of the shower and this pretty glass and marble mosaic tile for the shower floor and niche/wall border accent.  I love how this turned out.  I also added 2 small shelves for the walls, not for sitting but for propping.  I hate when I don’t have something to prop on to shave my legs, don’t you?

I had great results with the Kohler shower door in my old master bath, so opted for the same door in this guest bath, the Kohler Levity shower door.  It’s a good price for a semi-frameless glass door and gives a nice sleek look, without being so expensive.  We kept the exisiting handle set that was in our old shower to save money and used all brushed nickel/chrome in here for continuity.

A closer look at the walls and niche.

And the shower floor mosaic tile looks so pretty. I chose a medium gray grout for all the grout.

The charcoal vanity is also from Wayfair, called Jude and I’ll link everything used below.  I also ordered that pretty oval mirror from Wayfair.

When we first planned this project, we always knew we’d install beadboard in here and Mark did all of that work getting it installed.  At first, I was going with white beadboard, but after it went in, I started thinking that it should go dark, so chose a dark charcoal color called Peppercorn from Sherwin Williams.  I love how moody and dramatic it looks with everything in there.  We talked about painting those light switch plates, but decided to leave them white for now, but I think we may go with a decorative set down the road, maybe something silver toned.

Again, the doors are all newly painted Oyster Bay by Sherwin Williams and I love this little bit of color on the door.

Do you see that gorgeous wallpaper?  I did go with that and ordered the paper from Thibaut through a design friend of mine and had the same wallpaper guy install it for me.  We love it!

It’s very masculine and textured and such a pretty grasscloth in black and white. It looks like fabric on the walls.

The marble basketweave black and white tile is so classic and timeless, just what we wanted in here. I ordered that free standing toilet paper holder from Wayfair.  I didn’t want to put any holes in the vanity or the wall, so this seemed the best option.

Trash can picked up locally.

Those hooks are from Liberty and we picked them up locally, just simple brushed nickel hooks.

The last minute faucet purchase is Kohler and I picked it up locally. It’s a very pretty faucet and not too pricey.

A good look at the marble basketweave floor tile.  I had a fluffy white rug for in front of the vanity, but it wouldn’t go under the door, so I’ll just leave it bare for now, since I have a rug outside the shower.  The tile is so pretty I hate to cover it up, but if I find a really flatweave rug that works in here, I’ll add it later.

I got this pretty botanical print at Tucci’s here in Marietta, that I’ve mentioned to you before.

It’s a large and lovely piece and I thought it would be perfect in here for some added drama.

It’s a large piece, but I love adding large pieces of artwork to small spaces.

I did go back and add a live green plant in here for a little color and you can see how the bathroom flows from our family room area.

More of the vanity.  I love this gray and white marble top that came with the vanity, so perfect in here.

With pull out doors and a drawer underneath, it’s plenty spacious for a guest bath and 36″ wide.

A lovely furniture piece.

Adding a little bit of green does give this neutral bath a little bit of color!

See, I took a ton of pics so you could see all the details up close and personal.  I hope you love it as much as we do!  Renovating spaces take a lot of time and planning and we are very happy with the outcome of this one.  If I want to add color later, that will be easy to do, but I’m really enjoying it just being neutral gray, black and white for now and it feels so dramatic to walk in there and take it all in.

I’ll give you a breakdown below on how much we spent on this bathroom:

From Wayfair: ($3,000 in product)

Tile:  All tile including the subway tile, marble mosaic, and basketweave floor tile

Vanity:  Jude Vanity

Toilet paper holder:  Kohler from Wayfair

Shower Door:  Kohler from Wayfair

Faucet:  Kohler (bought locally)  $150

Labor:  (just over $3,500 Labor)

Tile installed by Luis Reyes with Keystone Renovations:  404-569-8845

Tile Supplies:  Bought locally for about $150, including grout, grout additive, shower ledges, transition piece for floor.

Shower Door:  Kohler Levity from Wayfair (installation $150) If you’re local and need a shower door installed, I would highly recommend Brian from Shower Door Monkey: 770-695-1888, he did a great job for us. Not everyone installs shower doors that are purchased and not bought through the install company.

Wallpaper and Installation:  $150 wallpaper, $200 Installation = $350

Misc. accessories:  Floor rug, soap/lotion holder, trashcan, hooks, hand towel. (all bought locally) $75

Approx. Total cost of renovation:  $7,375

I know that was long, but that’s a breakdown on our guest bath renovation! Thanks for reading til the end.  I’m hugely thankful that we were able to do this with the help of Wayfair. We wouldn’t have tackled this right now, if not for this opportunity to partner with them. They have so many great products online for projects such as this, so I hope you’ll check them out next time you are doing a bathroom renovation. We were very happy with all the products we got from Wayfair!

If you have any questions at all, please ask in the comments and I’ll answer them all. Thanks so much for coming by and for all your support of my blog.

This post is sponsored by Wayfair.  

SaveSave

SaveSave

SaveSave

SaveSave

SaveSave

– Rhoda

Farmhouse Bathroom Renovation #remodel #renovation #farmhouse #diy ~ Planet Weidknecht

Farmhouse Bathroom Renovation #remodel #renovation #farmhouse #diy

(realtor pic)

Welcome to our home! We purchased this charming house in October 2017 in a small town in Kansas. It was built in 1888 and was originally a two room house, with other rooms added on in 1925. There is so much I love about this house. We are renovating and I am so excited to say that we just completed the bathroom!

(realtor pic)

The one bathroom in our home is a small space. I am guessing there were some updates in the 70s, because of the greenish-brown paneling that was added to the lower half of the walls. The shower was in great condition, so it needed only a good cleaning. There is a window in the shower, so I think at some point there must have been a claw-foot tub, but the shower stays, and we ended up hanging a tiny shower curtain over the window with a tension rod.
Our home was the first one in this town to have indoor plumbing installed, so the owner must have been progressive in his time. We decided everything in the bathroom had to go, except the shower. We pulled out the sink, the toilet, the metal medicine cabinet, and even the greenish-brown wall paneling.
The cabinet on the wall seems to be built into a window, although we found no window on the outside of the home. We decided to keep the cabinet, but we removed the toilet paper holder and towel rack from the wood frame.
Old homes rarely have completely level floors or perfectly square rooms, and that’s influenced our decisions on material choices. We chose luxury vinyl plank flooring for under our feet. It is beautiful and textured, looks like real wood, is completely waterproof, and as a bonus, it goes down directly over existing flooring. In just a few hours, the old stained linoleum was gone and in its place was a beautiful floor that will last long past our lives.
The toilet placement is a bit further from the wall than in newer homes, due to the placement of the original plumbing, but like most issues we’ve come across, we just decided to work with what we’ve got. Once the floor was in, my husband added the toilet while I danced around waiting for it to be installed so I could use it.
Look at what we found when we pulled down the paneling! It looks like yellow tile printed on some kind of thick, black vinyl that was glued to the wall. To avoid any probable chemical release into the air, we elected to go with beadboard and place it directly over the yellow panels. I also removed the wallpaper that covered the top half of the walls. The top layer of wallpaper came off easily, but I had to hand scrape all the glued backing off the walls.
We replaced only one of the original baseboards because it was damaged, and installed an additional baseboard in front of the simple 1×6″ baseboards for both aesthetic and practical reasons. In the picture below, to the lower right, you can see we also added a frame to enclose the corner where the water heater was located when originally installed.
We installed the beadboard in 4′ tall sections, which fortunately fit right over the existing paneling choices by the previous owner. We opted for the MDF beadboard, which was lighter and easier to work with, as well as more affordable. Once painted, it’s as beautiful as wood beadboard.
Buying the right size bathroom sink proved to be a challenge. We originally purchased one at a hardware store in the nearest big town, but it was just too big for the space and we returned it. I scoured the internet and ordered the perfect pedestal sink for our bathroom.
We marked the spot on the floor where we would be installing the pedestal sink. The installation proved to be quite a challenge when we got to that point because the previous owner also worked with what he had and many of the newer fittings had to be modified to fit what was existing.
Beadboard is definitely rough-looking until it is caulked and painted, especially when you’re working with rooms that are 100 years old. We also discovered that under the wallpaper, the walls are either constructed of incredibly old cement board or incredibly old gypsum wallboard. The wallpaper even covers the ceiling, which we opted to leave in the bathroom as a textured ceiling, but the florescent light had to come down.
It took four months from start to finish. I painted everything a bright white, using eggshell finish on the upper walls, and semi-gloss finish on the beadboard, trim, and cabinet. I left the original hardware on the cabinet because I like how the metal of the handles has aged. I bought two metal shelves that hold storage baskets and our bathroom towels, which are all shades of gray.
I added a set of two bath rugs and I’m delighted that the stripes go the opposite way of the grain of the flooring. Rather than hang a toilet paper holder, I bought a freestanding toilet paper holder that also stores extra rolls. We also hung a new shower curtain rod, curtain rod hooks, and a white textured shower curtain.
We also hung a beautiful bathrobe hook on the side wall of the water heater cabinet we built. I love the diamond design on the bathroom towels we chose and think it’s a beautiful contrast to the lines of the beadboard. Once we added the top trim to the beadboard, caulked it all properly, and painted everything, the beadboard looks perfect.
I am in love with everything about our bathroom. I opted for chrome hardware for nearly everything in the bathroom because it goes so well with gray tones. All of the original outlets in the house are black, so we found a bronze outlet cover that complements the black.
One of my favorite finds was the bathroom wall mirror over the sink that features a little shelf at the bottom. We cut the beadboard trim to fit around the mirror so that it hangs exactly where we need it. I kind of breezed over how much work was put into the upper walls, but that’s the part of the project that took the longest.
It took many weeks of scraping, cleaning, patching, repairing, sanding, priming, and painting to get the upper walls the way I wanted them. I love the way they turned out and they sort of look like they are hand plastered. We also hung a bathroom vanity lighting fixture on the wall directly above the mirror, where the old medicine cabinet was hung, since the electrical lines were already there.
We modified the lighting fixture by adding a metal pull to the bottom, since the electrical that was there wasn’t hooked up to light switch anywhere. My husband is truly the king of functionality and he can take any problem in the house and find a solution. My talent lies more on the design side of renovation. He hates to paint and I love to paint. We are the perfect team!
As we finished up the final touches and I started taking final pictures, I realized that I hadn’t done any shopping for the useless, pretty stuff that gives a room warmth. It looked more like an impersonal, blank hotel room and needed more decor.
The cabinet for the water heater isn’t quite finished yet, so I’ll show you the finished project when we’re done with it. I also found a simple lighting fixture for the ceiling to replace the florescent lighting fixture. I opted for a frosted flush lighting fixture (brushed silver base) so it would give off a softer light than the vanity light.
We headed into the nearest big town to shop at hobby lobby for a few items to bring some warmth into the room. I had a glass vase on hand, so I wrapped a bit of twine around it and purchased a single stem artificial flower that leans toward a light green/cream color combination. I picked a wood/metal tray to prop up behind it and added a small chicken wire basket that contains three little burlap bags holding green artificial plants. The walls are 9′ tall and these extra decor pieces help draw the eyes up as you walk in the room.
We also found this fabulous candle sconce that brings both wood elements and iron elements into the room, plus the diamond shape complements the diamond design on the bathroom towels. It’s always a good idea to bring wood and greenery into a room for a warm look, especially when using a white and gray color combination because otherwise the room feels cold. I am absolutely ecstatic with the final design of the bathroom and love everything about it!
Now that our bathroom renovation is done, it’s my favorite room of the house. I hope you love it as much as we do and I hope I gave you some ideas for your renovation. It feels so good to be done, but the work is far from over. The next room reveal will be the kitchen, which features an original sink and a built-in corner cabinet, but we have a long way to go before it’s done.
This home is likely the last house we will renovate. We’ve done a few others over the years, but we are getting older and slower. We are taking our time with this one, since whatever we do to this home is what will be there until we’re gone. Thank you for taking a look and please feel free to ask questions or leave comments about what we’ve done. And, yes, I’m a bit wistful that there is no claw foot tub.

Note: I have included links to many of the items we added to our bathroom, in case you want to add them to your home. Only the amazon links are affiliate links, which means if you purchase those items through the link in this post, I’ll be able to add a few pennies to my change jar.

Source

http://www.weidknecht.com/2018/02/farmhouse-bathroom-renovation-remodel.html

Johnathan Taylor Thomas’ Character Randy on ‘Home Improvement’ Would be a Member of the Alt-Right, Comedian says

The successful (and at times controversial) return of Roseanne has TV fans thinking how best to resurrect other favorite working-class sitcoms of the 1990s. And, of course, at the top of that list is Home Improvement.

Roseanne is back on TV, nearly 20 years since the first run of the show went off the air in 1998. So Tim Allen’s classic comedy, which aired on ABC from 1991-1999, seems primed for a revival, too. And if Home Improvement were to actually come back, it would follow Roseanne‘s lead and give one of its main characters a turn to the right—that is, if comedian Joe Mande had any influence on the script.

A fantasy reboot script written by Mande was shared on Twitter Monday by Patton Oswalt. In the episode, billed as the pilot, the comedian depicts none other than Johnathan Taylor Thomas’ character Randy Taylor as a member of the alt-right.

home-improvement-cast The cast of “Home Improvement” in a 1998 production photo. Series creator and star, Tim Allen, is in the center, wearing a blue shirt. Jonathan Taylor Thomas is in the front row, on the right. Touchstone Television

The script features a scene in which Tim Taylor (Allen) finds his middle son Randy gearing up for some white nationalist revelry at an upcoming rally. The Tool Man walks in on Randy assembling a tiki torch in the garage as he’s trying to memorize “14 words” for the rally: “We must secure the existence of our children and a future for white children.”

In typical dad-joke fashion, Tim responds to his son’s white supremacist speech with some musing about Rally’s cheeseburgers, after which Randy coyly explains he isn’t referring to a fast food joint. “Didn’t mom tell you? I’m Alt-right now,” Randy says.

In the script, Tim appears to be pleased with his son’s newfound motivation to make America great again, and tells Randy he’s “proud” of him for “believing in something.”

in these slideshows

The return of Roseanne found big ratings as viewers found Roseanne Connor emulating her creator, Roseanne Barr, and her right-wing, President Donald Trump-loving tendencies. That success has spurred chatter about whether a trend of old, all-white-cast TV shows featuring Trump supporters is in the offing.

But if Home Improvement were to return, it would seem unlikely for Randy to become the show’s resident white nationalist. (Our money’s on Randy’s meathead older brother, Brad.)

When the show originally aired, Randy seemed to be headed down the liberal path. Not only was his character uninterested in the hyper-masculine, alpha-male, doofus rhetoric more common to Tim. Randy was also more artistically inclined than his brothers Brad (Zachery Ty Bryan) and Mark (Taran Noah Smith), appearing in school plays during his younger years and writing for the student newspaper about issues such as environmentalism and political corruption. And lest we forget, Randy nearly denounced his religion in a Season 7 episode that aired in 1997, which was also a major problem for Tim.

Needless to say, the lack of shared interests between Tim and Randy was the cause of much strife in the Taylor household—and sitcom hijinks for viewers.

But considering Thomas’ character was only 15 and still in high school when Home Improvement ended, there’s always a possibility college and life events could have influenced him to radically alter his politics.

Mande did not respond to Newsweek‘s request for comment about his Home Improvement spec script.

Source

http://www.newsweek.com/home-improvement-roseanne-reboot-trump-868652

Jury convicts Steven J. Walsh of felony home improvement fraud charges

RICHMOND, Ind. — A Wayne County jury has convicted a Richmond man on two felony counts of home improvement fraud.

Steven J. Walsh, 51, of the 4200 block of Endsley Road will now be sentenced at 2:30 p.m. April 10, according to court records. He faces a standard sentence of one year and a range of six months to 2½ years on each Level 6 felony conviction.

The trial lasted two days in Wayne County Superior Court II. The jury decided Walsh had reached a contract and accepted advance payment to provide home improvement work that he did not complete.

Walsh is charged with nine felonies in the case, but the charges were severed because they involve several victims. The initial trial contested only the first two charges.

The remaining charges are two counts of home improvement fraud as Level 6 felonies, two counts of home improvement fraud as Class D felonies and three counts of theft as Class D felonies.

In another active case, Walsh is charged with two counts of dealing cocaine and one count of dealing a narcotic drug, all as Level 4 felonies. A Superior II trial in that case is scheduled for May 7.

Walsh has previously been convicted in Wayne County on two felony and one misdemeanor count of theft, two misdemeanor counts of battery and one felony count of resisting law enforcement.

3 years for heroin dealer

Donald Eyler, 23, of Dayton, Ohio, was sentenced to three years of incarceration for four drug-related charges.

Eyler pleaded guilty to two Level 5 felony counts of dealing heroin and to two Level 6 felony possession charges, one for heroin and another for methamphetamine. A misdemeanor possession of marijuana charge was dismissed with the plea agreement Eyler reached with the Wayne County Prosecutor’s Office.

The agreement implemented three-year sentences for both dealing charges and one-year sentences for both possession charges. Eyler will serve all four sentenced concurrently.

He was credited with 201 days served and 67 days of good time.

Eyler’s dealing charges stemmed from Aug. 6 and Aug. 30, 2016, controlled buys by a Wayne County Drug Task Force confidential informant, who exchanged $40 for heroin each day from someone he knew as Jamie. 

The drug task force on Aug. 31, 2016, conducted surveillance on a residence in the 400 block of South 12th Street to find Jamie. When Jamie was stopped, heroin, methamphetamine and marijuana were found in his pockets.

At that time, task force officers learned that Jamie’s true identity was Donald Eyler.

Read or Share this story: https://pinews.co/2GmOZ9U

Share This Story!

Let friends in your social network know what you are reading about

Jury convicts Steven J. Walsh of felony home improvement fraud charges

A Superior Court II jury convicted Steven J. Walsh of two felony counts of home improvement fraud after a two-day trial.

Sent!

A link has been sent to your friend’s email address.

Posted!

A link has been posted to your Facebook feed.

Source

http://pal-item.com/story/news/crime/2018/03/30/jury-convicts-steven-j-walsh-felony-home-improvement-fraud-charges/473945002/

A Cozy Kitchen Renovation Reveal Part I – A Cozy Kitchen

OMG I can finally tell you that the entire kitchen is done done DONE. It’s an amazing feeling and I love the way it turned out. As you know, I started this process a long time ago!! There are a lot of bases to cover so I’m not going to cover everything in this post, instead I’m going to separate the posts into three or four posts.

This one is all about the reveal! I love dramatic before and afters and I have to say, the before photos show a pretty intense makeover.

This was my first ever renovation and I learned a lot. I also designed this space myself, which was another huge learning experience.

INSPIRATION
Let’s start with the inspiration. The house itself is an English-style cottage so I wanted to be true to the house. I wanted it to fit within the style of the house so I went with shaker cabinets. What I didn’t want? Was an all-white kitchen. I wanted something with a bit more style but at the same time, I wanted to make something that would be sellable and not too custom.

Here are some BEFORE photos that show the dramatic change:

And here is my mood board! I highly recommend making one of these before you start a demo project, especially if you’ve never done one before. It helps with seeing everything in the same place. I ended up changing some things as I went, but it was a good general idea.

CABINETS
I decided on the sage green the minute I saw this kitchen. It was the perfect soothing color for me. I decided to go with Ikea cabinets and Semihandmade fronts that were painted in Farrow and Ball’s blue grey. I will talk more about my experience with Ikea cabinets (hit and miss) and Semihandmade (flawless experience). Also, did you know getting cabinets painted was expensive?!?! The price almost made me fall out of my chair. I’ll share the price with you, too. This post is coming soon!

I chose black hardware because I think it’s beautiful with the sage green cabinets. The hardware (in total) was about $75 (not too, too expensive) so if the “black hardware” trend fades out of style, I can easily replace it with something that’s more current/classic.

I paired these sleek-looking black pulls with black mushroom knobs.

They both feel super sturdy. My only complaint is that they get dusty very quickly so a quick wipe down once a week has become a habit. Other than that, the price is right and quality is really good.

APPLIANCES
Before we started demo, I started to speak to KitchenAid about collaborating on the appliances and to my delight, they said agreed to work with me on this project!

We decided collectively on the 30-Inch 4 B-burner Rangetop Commercial-Style in Black. I absolutely love this stove. As you know, I cook and bake a lot and needed something that was a workhorse.

I went with the black range to match the hardware and I’m SO glad my-brother-in-law, Sean, convinced me to go with the black. We were debating on white for a lil’ bit but the black adds nice contrast.

Above the range, lives the 30-Inch Wall-Mount, 3-Speed Canopy Hood. Right when we got this installed, Josh decided to fry up a porchetta and this hood sucked all that smoke up and out! It worked like a pro.

The refrigerator is the most beautiful fridge I’ve ever had in my life. It’s the 36-inch Standard Depth French Door Refrigerator. There is cherry wood on the inside and the drawers slide and glide so easily and flawlessly. There are temperature control drawers, called Preserva Food Care System, that keeps produce so crispy and fresh. It’s also a really good size fridge, which is great for me with shoots and stuff. I did a full groceries right when we got it hooked up and there was still SO much room.

The 24-inch Stainless Steel Wine Cellar with Metal Front Racks is magical because you can set one area’s temperature for white wine and another area for red wine so you can store both in the same fridge—genius! When I take a bottle of wine out of the fridge, I feel like a dang adult.

The 44 dbA Dishwasher with Dynamic Wash Arms and Bottle Wash…is my heart. I’ve had this blog for SO very long and didn’t have a dishwasher. Billy and I washed every single dish by hand, nearly every single day. I didn’t really even think it was that big of a deal but now that I have a dishwasher it is truly life-changing.

I’m super grateful to have a machine that’s sole job is to wash dishes! It’s a magical moment for me. It’s also SO quiet. I often times do all of my work at the kitchen table and almost forget that I started it—it’s that quiet.

FLOORING:
We ended up deciding on this beautiful tile that looks like white-washed hardwood. Why did we do this? Because I’m hard on kitchens. While I wanted to create a beautiful space where I could shoot content for the blog, I also wanted a space that had a lot of function. I wanted everything to be durable and sturdy and actually work well.

I went with tile because spills happen and I know that I’m inevitably going to spill water or caramel or drop a pie. I wanted something that could take a beating and tile is it. This tile looks like white washed hardwood and so far so good! It’s really amazing. We got a medium grey grout so I’m not on my hands and knees trying to scrub the grout.

COUNTERTOPS
I decided to go with calacutta marble countertops. I knew that I would use the peninsula to shoot content on and I wanted the surface to be beautiful.

Once I settled on the sage green cabinets, I knew I wanted to find a slab that had a bit of green going throughout the marble. I found it, buried in a marble yard behind all of this other beautiful marble. It was forgotten about and had probably been there for months. I haggled with the guy and got it for about half off—-score!

I actually found the countertops and then picked the exact color of the cabinets based on what I thought would be complimentary. This order worked out for me and I would actually highly recommend it, especially if you’re going with a piece of marble or caesar stone that is super unique in color and design.

BACKSPLASH
I treated this kitchen very much like how I dress: a mix of highs and lows. I knew the countertops would be a splurge so I had to chill it with the backsplash. Initially I found this beautiful scalloped backsplash but that added up QUICK. It ended up being too expensive so I searched low and far for this perfect white subway tile. I didn’t want it to be shiny but I also didn’t want it to be so matte that stains would set in.

This was the perfect in between and I bought all the tile for $150—pretty good. I ended up going with black grout to match the hardware and I loved how it turned out. Subway tile can be a bit boring sometimes but I think if it’s surrounded by other unique components it can be classic and chill.

Lastly, I want to give another big thank you to KitchenAid for supplying all of the appliances—they truly are a dream come true!! All of my opinions about their products are my absolute own.

I’m going to post a few other posts soon. I’m going to do a deep dive into the cabinets, working with a contractor for the first time and tips on designing your own kitchen sans designer! It should be fun!

Let me know if you have any questions or I missed any links below!

Welcome to the new and improved A Cozy Kitchen.

xoxo,
Adrianna

Here are all the links to the items that we used!
Appliances: KitchenAid | Cabinets (Ikea boxes with Semihandmade Fronts) | Farrow and Ball Paint for Cabinets | Knobs + Pulls | Floor Tile | Subway Tile  (similar style online) |  Calacutta Marble | Sconce from Cedar & Moss in Matte Black/Opal | Sink from Kohler | Faucet from Brizo | Grey Kitchen Rug | KitchenAid Mixer in Pistachio | Kitchen Chairs | Tea Kettle | Eye Ball Planter | Cup Measures | Soap Dispenser (I truly love this!) | Aesthetically Pleasing Kitchen Sponges | Wooden Dish Scrub | Kitchen Nook Lamp Shade | Center Kitchen White Lamp Shade | Espresso Cups from Hay Design