Master Bathroom Before & Makeover Plans , and stop by soon for the next reveal after this one which should be (I hope!) the new shower & door.

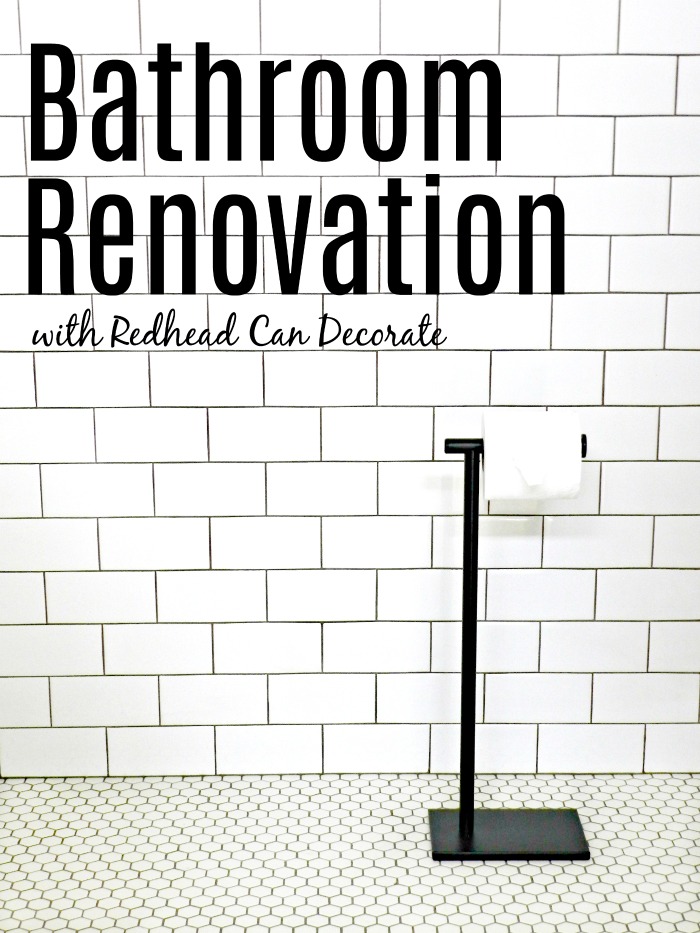
View toilet paper holder source below.
We are now heading toward the 10 year anniversary of when we moved into this home. If youfollow us here at redheadcandecorate.comyou may recall how I’ve really tried to get around the big elephant, I mean tub, in the master bathroom. I’ve decorated around it with our “DIY Wood Planked Wall” and heck, I’ve even decorated in it so my husband and I could have a romantic date in the bathroom. Let’s not forget painting the big faucet, too.
However, none of that helped the fact that there was only 1 sink ? , a dated old tiled shower, and that wasted space of the tub just drove me insane every time I envisioned what I could design there. If you look at the photo below, yes, it looks good. Even beautiful, if I dare. It was even featured in a magazine, here. However, can you guess how I had to open those blinds every day? Yep, I had to hop into the tub to get to them. I’m getting too old for that, man. Then there was the toilet. Oh man, I hated that whiny hardly flushable toilet. It was bad, trust me on that. And the worst part…sharing a sink with my Italian husband. Sorry Rick, but you are messy.
So, yes, we were ready. We figured if we are going to stay here for at least another 10 years, we may as well make it exactly what we need and desire.
So, that brought us to our decision to finally remove the tub, and the tile (keeping the wood floor and wood wall). We knew it wouldn’t be easy and knew it was way beyond our expertise. To be honest, we don’t have that kind of time either. My husband is a full time lawyer, and I work 30-40 hours per week here on this blog besides taking care of the kiddos. So, we hired out for the tile, but we did remove the tub ourselves.
Here’s some advice if you are looking to remove a jacuzzi/Roman tub yourself. Removing the tub is not easy by any means, but something 2 people can do themselves after they research what is involved. Warning: remember there is electricity involved and pipes, so this can be dangerous if not done professionally. So, while we did remove the majority of the tub ourselves, we hired a professional plumber and electrician to unhook the important parts. There are many videos on line that can walk you through the basic removal, but the electrical and plumbing parts are way more involved. If we had to do it over again, I would have hired out all of it because the mess was unbelievable.
The other advice I have is to hire a professional to do the tile removal and install. One of the reasons I say this is because you will have enough to take care of with prepping the house for the removal and cleaning up afterward. I’ll elaborate on that further down, but trust me when I say that this is a BIG JOB. If you live in the SE Michigan area I can recommend our tile guy, just leave me a comment below and I’ll get back to you. I think the photo below captures why I feel hiring out is the best option. The tile craftsman had to remove all of that tile. The pretty cement you see on the floor is what levels the floor after they finish the removal. This was at the end of day #2 out of 5 days total for the tile.
Here’s a great before shot of the tile they had to remove in the shower. Keep in mind it was also on the floor outside the shower.
What I really want you to know is that the mess does not stay confined to just the bathroom. Oh we tried, trust me, but since our bedroom is directly outside the bathroom, we had to remove everything, tape closets and dresser drawers shut, and cover everything in plastic. We also hung drop cloths on each enterance, and the guys taped themselves into the bathroom 8-O. This had to stay this way for 5 days, so you will have to find another place to sleep and obviously brush your teeth/shower. It may not seem like it would be that stressful, but when you’re use to running a very tight ship, it definitely causes some anxiety and keeps you very busy.
The tile guys had to go in and out constantly for 5 days (with shoes on) so you will need a clear, protected path to the tile cutting station that should be outside or at least in your garage. They should be using a wet saw to eliminate that dust, however your home will still be covered in dust from the tile removal and all of the construction movement. That reminds me, have you read our story about the “Granite Nightmare” we had? It’s a must read because there was over 34k damage to our home. Please read if you are planning on installing granite anywhere in your home: “Granite Nightmare“.
Another fabulous reason to hire out for tile install, is because I have absolutely no experience in doing it. Just look at the gorgeous experienced craftsmanship that went into this tile. Note- the plumbing is set on the left for my husband’s new sink. Also note- that we have BIG DESIGN surprises coming soon on that wall to the right of the window and on the “bench” my husband is building on the far right. The bench actually happened out of necessity when we realized there was a big drain pipe there that couldn’t be removed.
Sneak peak of the sink, wall, and bench below and I promise to post soon about all 3 . so you don’t miss it.
*** Some of the links in this post may contain affiliate links for your convenience. Read full disclosure policy here.
Isn’t the classic white hexagon tile just so pretty, especially up against the wood? The tile guy and I both came up with this design, and I was set on *dark brown/grey grout due to the brown in our existing Corian counter-top. I have to be honest I had a hard time choosing tile. I even tried to go to a tile expert store and wow, that place was horrible. The best advice I can give you when choosing your tile is to search on Pinterest and save the styles you like the best. When you find your tile installer, ask him what his advice is on what you saved and together you should be able to come up with a plan.
*I do not recommend using dark grout. I love how ours turned out, however, it was difficult for the color to not show on the flat white tiles. The shiny tiles weren’t an issue, but the flat were. Lots of cleaning involved and more work for the tile company if you choose to go dark. After the flat tile was finished we had to scrub them with white cleaning sponges like these.
So, now let’s take a peak into the shower area, although I can’t share the full shower until the shower door comes in.
Whoa! What a change, right? It’s exactly what I was looking for. Vintage, classic, modern, white. Check out that gorgeous toilet, too.
(The toilet paper holder is a great choice as well. I absolutely love it -source below.)
I think the gorgeous tile speaks for itself, but I want you to get to know our new toilet, too. At first I was going to pick just a plain white boring toilet and white toilet seat. Then I got to researching and realized that the toilet is way more involved than just the color. This toilet is special for 2 reasons. One, it is higher than usual toilets (comfort height is the term) and doesn’t hurt my knees or back as much as our old one. Two, this toilet is super powerful. When I push that handle to flush, WOOSH!!!! This baby takes it away in a flash. In addition, I don’t have to wait 5 minutes to flush more than once. It’s instant.
We love this toilet so much, I’ve nick named it “Turbo Toilet” . I am so not joking. The toilet has changed both our lives. I actually just bought another one for our 1/2 bath (see sources below).
Oh wait, I’m going on and on about the turbo toilet, what about that gorgeous black seat? I am quite proud of this idea, my friends. There’s nothing more classic vintage than a black toilet seat. The idea came to me one day, and when I found this wooden round black beauty, I just couldn’t resist. The two are a perfect match.
Can the “can” get any better? Why yes it can ? . Did you know that your toilet can have a censored night-light that goes on when it’s dark as you approach the toilet? Well, now you do. I completely recommend getting one for safety and fun reasons and my source is below. I kind of feel like going to the disco now.
Next up, is our full shower tour including the vintage style faucet system we had installed, the new glass shower door, and an amazing tiled shelf I designed. Then after that, I have several more reveals including how we managed to make our white tile not seem so sterile by adding rustic and cozy elements. There’s a ton left to see still including my vanity makeover, my husband’s new sink, the fireplace (sh!), the custom stained bench with a DIY button tufted back, the new mirror & light fixture, and lastly the ceiling fan, and new blinds. EEK.
Tags: , , , , , Posted by Julie