All posts by Shannon

Guest/Kids Bathroom Renovation – Before

Thank you Jeffrey Court for sponsoring todays project! As always, all opinions are our own. 

I’m so excited to share that we will be blogging about our most recent DIY renovation. We’ve been in our “new-to-us” house for the past 2.5 years and have done countless projects. However, with now two children we rarely have the time to document those said projects. We were invited by Jeffrey Court to comet in a One Room Challenge (ORC) and we accepted the offer. The best part is that we were already planning to rip out the kids bathroom and bring it up to date. The ORC is a win-win-win for us.

  1. Jeffrey Court has supplied us with ALL our tile (you guys, they have some amazing tile)!
  2. The challenge lights a fire under our butt to get this bathroom done within a month time frame (without the challenge I’m sure we would have been dragging this out by a few months).

Over the next few weeks we will be sharing step-by-step each process of our remodel. We are doing 95% of the remodel on our own! The only thing we are hiring out is the taping and texturing of the drywall.

Here are some before photos of our very ugly and builder grade diginy guest/kids bathroom.

First order of business… the door! We are changing it to a pocket door! We have to move the electrical to make this all work.

The hideous floors that were throughout our entire house. The bathroom and laundry room is the last two rooms that we have it in. I can’t wait until it’s gone forever!

More dark dinginess! The bathroom and toilet are being replaced with new white not almond color units.

We are also adding a light in the shower/bath area. We need more light in this interior bathroom.

We had the countertops replaced back in December and had to rip off the mirrors. Me not thinking–never took before photos. So this is what you get. We added a second sink so when the time comes both kids can brush their teeth at the same time. We found an awesome mirror/medicine cabinet combo that we are installing above the sinks!

As you can tell our bathroom is small and we are trying to maximize the space–make it lighter, brighter and roomy! Stay tuned, I’ll be sharing our vision board and demo in the coming week!

Source

http://sewwoodsy.com/2018/04/guest-kids-bathroom-renovation-before.html

A Cozy Kitchen Renovation: Review on Ikea Cabinets with SemiHandmade Fronts – A Cozy Kitchen

When I first started looking at kitchens, the ones that stood out to me the most, the kitchens I kept pinning and repining were all from Devol Kitchens. Their kitchens are so dreamy. I love the in-set cabinets that just melt into the boxes. I love how cozy and classic and rich they feel. And if you have the budget, Devol Kitchens will actually design your kitchen lay-out and ship a whole set of cabinets to you. They start at around 60k. LOLL. That was not in the budget, unfortunately. Not even close.

SO, I got a bid from a cabinet maker and it was closer to 20k for what I was looking for (shaker-style cabinets that had that in-set). That price tag still hurt, so I did some more research and came across Semi Handmade, a company that makes fronts that fit onto Ikea boxes.

Like everyone who was broke AF in their 20s, I’ve had a love/hate relationship with Ikea. A few years ago, I vowed to rid my entire apt of anything Ikea so I was a bit timid when it came to this cabinet process. It’s safe to say that the cabinet process still resulted in a love/hate relationship! LOL. Still the same—nothing has changed!

So here is how the process went down (I’m including prices just to be transparent and informative but of course this will vary depending on the size of your kitchen):

1. Measuring Kitchen – If you’re getting custom cabinets, the process for it usually goes like this: demo, space is cleared out and then the entire space is measured and custom cabinets are built for the space. This is not a bad way to do it. Of course, this is why some kitchen renos take a ton of time.

With Ikea, they sub-contract a company that comes to your house and measures your kitchen space. These measurements then get put into your “profile.”

2. Kitchen Design Time– You have to make an appt with Ikea to design the space. There are also companies that will design it at your house in the space. This is the route I wished I had gone because it’s easier to imagine.

We went to Ikea and sat down with a super nice guy who was SO patient and lovely. He went through all of the options for cabinets. Get ready to make LOTS of decisions.

Do you want uppers here? do you want three drawers there? A lazy susan, etc. Get ready to make decisions.

It’s honestly not bad at all and so easy. I actually had a lot of fun laying out the kitchen.

3. Order is Made – From this design, they’ll print out a huge list of items that you’ll need. They’ll put in the order. I knew from the get go that I wanted the boxes only and wasn’t going to order fronts. I told the guy from the beginning that this is what we were doing so there wouldn’t be any confusion. In fact, he told us it was a super popular route so there was really no issues.

The order for just the boxes came to about $2600. They were having a 4th of July sale and honored the sale (even tho it was way after) because I made the appointment during that time. The final total came out to $2000 for just the boxes. (NOT BAD!)

From the time the order was placed to the time the cabinets were at the house, it took two weeks. Also, great.

4. Semi Handmade Order – I got in contact with Semi Handmade and they were nice enough to give me a discount in exchange for some coverage. Being super transparent here! But I knew, discount or not, I would’ve gone with them because for me they were the best option. I went to one of their stores and got samples of their cabinets. I liked the shaker-style and since I wanted a custom color, I got the DIY shaker.

I sent them my Ikea plan and they made the order based on that plan. They were so efficient. In the world of cabinet speak (toe-kicks (the pieces of wood that go under the cabinet) and filler pieces (pieces that fill in gaps), left fronts, right fronts), they explained everything and were super helpful and patient with me. They make everything to order so the lead time was about two weeks.

They delivered the cabinets on a flat bed and I placed it in the garage. They also called a few days later to make sure everything was ok. The total cost, before discount, for the fronts was $4200. Way cheaper than the 20k price tag I was originally quoted for custom cabinets.

5. Painting the Cabinets – We got the cabinet fronts professionally painted and I was at first very floored at the $4k price tag we were quoted for painting the cabinets. But then when I saw the process, and how intense it was, I quickly understood.

I went with Farrow and Ball Blue Grey. Farrow and Ball is amazing quality paint but it is pricey. I believe each gallon was about $150. We used three gallons. To give you some context, Benjamin Moore is about $40 per gallon.

I literally can talk about kitchen renovations all day long. I love it. In another world I would maybe flirt with being a kitchen designer.

The painter lightly sanded the cabinets, put on primer (that was color-matched perfectly to the color paint), dried it, sanded it again, added caulk to any of the creases and then applied two coats of paint, sanding between each coat. It took a full week but they are pretty flawlessly painted. It was also during an October heat wave so bless his soul.

6. Install of Boxes – Have you ever put a piece of Ikea furniture together and considered quitting and throwing it out?! Lol. I have. So when a friend of mine recommended we hire someone who specifically does Ikea cabinets, I listened.

We ended up hiring a cabinet guy who specifically installs Ikea cabinets. Here’s the thing that no one tells you about renovations: people will make mistakes. Even people who are pros.

We had some bumps in the road with the cabinet-install. First, him and about two other guys showed up and started putting the boxes together. We quickly learned that the measuring company completely mis-measured the space and the peninsula left about 2-inches of space to walk through (we needed about 3 feet).

So we had to rework the plan on the spot. We lost about 2 cabinets. We also had a few tall boxes missing that Ikea just completely forgot to deliver, even tho it was on the order form and we paid for it.

We also learned that we had to exchange a box that came in the wrong color but the cabinet was too big to fit into either of our cars (and a pick-up return would’ve taken about 2 weeks) so we had to borrow a friends car and return it ourselves.

7. Mistakes Will Happen!– Basically, Ikea is a hot mess and there was a very dark Thursday night where I found myself at the returns section, eating ice cream, vowing to never step foot in an Ikea ever again. They’re also not a very helpful company to deal with over the phone. But truth is, once we got everything figured out, I would still do it.

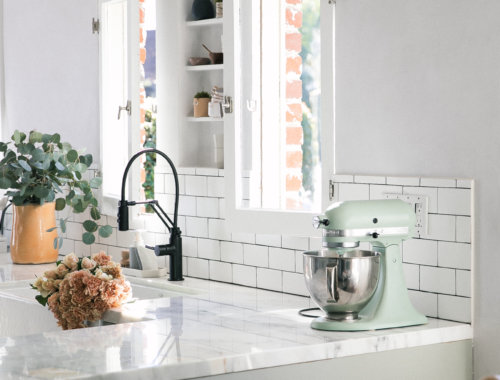
I love how the cabinets have organized drawers. I love how wide they are. I like that they were affordable and are nice and clean. And I finally have a big drawer thingy dedicated to the trash! Both recycling and trash! I feel blessed. So yes, I would do Ikea again.

Here’s what I would do differently: I would hire the guy who installed the Ikea cabinets to design the space and handle all of the ordering from Ikea and Semi Handmade and install from front to end.

And he made mistakes!

The kitchen slopes downward in the house. It’s just a thing with old houses, sometimes they’re janky. It’s called character. Lol. And this house has it. Because of the slope, the way the cabinets were installed, the wine fridge and the dishwasher didn’t fit.

I about passed out. I didn’t understand how it was going to work. BUT, the cabinet guy came back and figured it out. He took out a piece of filler, took off the wheels and boom they were in!

The most important thing you can have in someone you hire is someone who fesses up to mistakes and fixes them and moves on. That’s what he did. And honestly our contractor did that too. And for that I am grateful! NAMASTE!

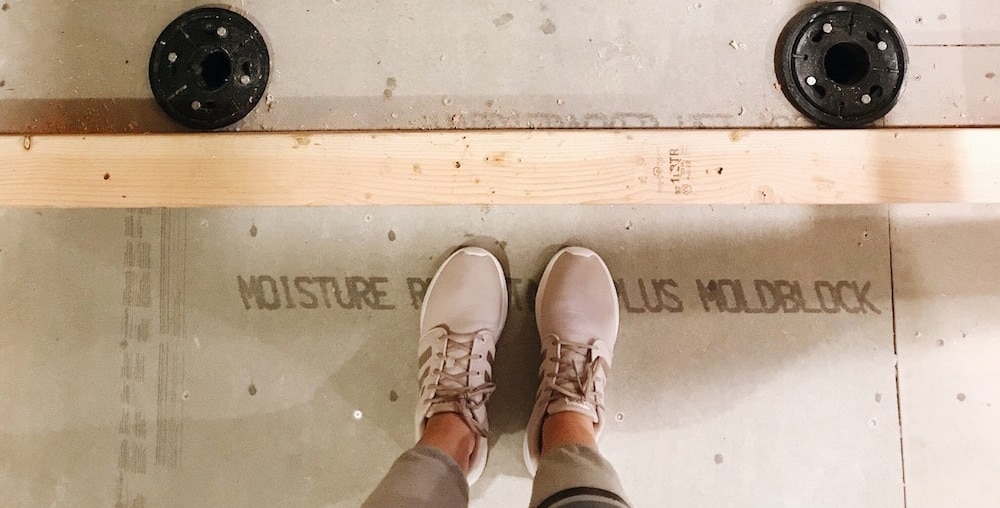
7. Install of Fronts – After the boxes were in, he put on the base of the countertops (I forget the exact term for this) and our marble fabricator came out to take measurements for the counter tops. Then, he started to put on the fronts of the cabinets and it started to look like a real life kitchen!

After the cabinets fronts were on, he started putting in toe kicks and filler pieces. And then the hardware went on (we used these guys from Wayfair).

And that’s it! From start to finish the install of the cabinets took about a week and a half. I think it could’ve gone a lot faster but we had some bumps in the road.

Let me know if you have any questions below!

xoxo
Adrianna

Our Master Bathroom Renovation, 2 Weeks In: On Plumbing and Choosing the Right Fixtures, Heights, Valves & Drains

This Master Bathroom project is a doozy! The beauty of DIY is, in many cases, you can figure things out as you go. You do the work when you have the time, or you order the materials as you get the money, or you take it step-by-step and eventually see it all come together. This project, is not like that. And nowhere is that more true than with the plumbing.

If a bathroom renovation could be visualized as a giant circle of people holding hands, then every other person would be some kind of plumbing fixture or drain. If one person moves, the people holding hands with them move. So, any change to the plumbing, no matter how small, impacts some other part of the project. And any change to other parts of the project, changes the plumbing. We had to make a lot of on-the-spot decisions this week, more things that I’ve never even thought about and yet, suddenly absolutely had an opinion on. Here are a few decisions we’ve had to make, (and some things for you to think about in your own future, or current bathroom projects).

Toilet location

Ideally, you want the toilet in that one spot. But, as it turns out, there’s a floor joist there. Or a recessed light fixture from downstairs. Or heating vents. The locations where we wanted our toilet (that we even bought a very slim toilet tank for) fell right on a floor joist, so we had to move the toilet out a few inches. In order to keep enough space in front of the toilet, we also needed to push the shower wall out (the toilet closet and shower share a wall – you can see the toilet drain behind the wall in the photo below).

But the shower was already borderline too small, so we also pushed the other wall into the bedroom a few inches. That wall was coming down anyway to put in a pocket door, so the only additional work was cutting some tile. We went forward with it to make our final shower size 48×60.

Valve types

Choosing a shower may seem straight forward, but a lot of homeowners spend less time thinking about how they want their shower controlled. Inside the wall is where you put your shower valves, and different valves do different things, and what you choose depends on how you want your shower to function. We actually completely misunderstood what we wanted and what we ordered and had to have some extra valves overnighted.

We went with two shower heads coming from opposite walls, and a rain head coming from the ceiling. We want to control the temperature of each independently (Jules has lizard skin or something – she’s apparently impervious to scalding heat), as well as being able to control the flow of the water. So we chose to run separate lines for each head, and give them each a thermostatic valve for temperature control and a transfer valve for flow control, or to turn it on or off.

If you’re unfamiliar with  the roles each valve plays, essentially the thermostatic valve only controls the temperature. You set it where you want and you leave it that way. The transfer valve is what turns the water on and off, and the more you open it the more water flow you get. The great thing about this setup is, Jules and I can each set a shower head to our preferred temperature, and all you have to do each time you shower is turn on the transfer valve. It will always be a consistent temperature, each time you jump in the shower.

The transfer valve we used also allows you to hook up multiple shower heads if desired, and each position of the valve passes water to a different fixture (or set of fixtures). The downside for that route is that you can’t set different temperatures for each shower head, but you can cut down on the number of controls in the shower if that’s important to you. We decided to have a different transfer (small knob) and thermostatic (large knob) valve for each head.

For the sink, it can actually be a bit tricky to track down the correct valve to use for a wall mount faucet. Valves for countertop mount faucets are included with the fixture, and you don’t have to worry about it. But wall mount faucets require a special valve – here is the wall-mount valve we used.

Valve & fixture locations

So you managed to get them all in your house, but now to choose where to put everything? How high up we want the shower handles; how far apart they should be from each other; how high to put the shower heads; how high above the sinks we want the faucets. For some decisions, we rested on the norms from the professionals, or at least wanted to know the norms. Our contractor said he usually puts the control valve up 44in from the floor, so we put the bottom valve at 40in and the top at 48in.

We also decided to put all 6 valves on the same wall, which will be right inside the door. This way you can just reach in and turn whichever shower head on. It’s also a bit easier than trying to stuff plumbing into a wall with a pocket door.

Our sink valves are 6″ above our countertop.

Water waste

Water waste has been a bit of a concern for Jules and myself. We don’t live in a particularly dry climate, but nobody likes to just run water for long amounts of time. The problem with our bathroom is it’s across the house from our utility room, and I swear the water lines wrap themselves around the house 5 times before making their way to our bathroom, because it can sometimes take a couple minutes after turning on the shower before it heats up.

For this reason, we decided to spend a little more and have our plumber install a recirculating pump to our bathroom line. What the recirculating pump does is, it cycles hot water back and forth between the water heater and the bathroom fixtures so that, when they’re turned on, the water is immediately hot. Combine that with our valve setup outlined above, we have perfect temperature the moment we turn the shower on.

Now, there’s a little debate about how much good recirculating pumps actually do. Since you use electricity in the act of saving water, some people think it’s a bit of a wash (pun!). But the pump we’re having installed is a smart pump (this is the one we’re using), which learns our usage behaviors and adjusts accordingly. So it will pick up on the times we’re most likely to shower (Jules gets home from the gym every morning around 7:30 and hops in the shower), or do the dishes (morning and evening), or do laundry, and it will turn itself on and off to accommodate. It uses as much energy as a 25 watt bulb and saves over 16,000 gallons of water per year per household–worth the expense.

Shower Drain

This one was a little tricky. You’ll remember last week we left off with a picture of a pipe sticking through the ceiling in the girls’ room. That was not gonna fly, so we spent the next morning searching for a solution.

To back track, the problem was the amount of water drainage from our shower and our plumber wanting a 3in drain as opposed to a 2in (standard in most showers). The reason for that is the potential water flow through our three shower heads. They ran a new water line directly from our water heater to our bathroom to provide ample water pressure if we decided to have all 3 shower heads blasting at once. Most often there will be one shower head running, and at a moderate flow, and a 2in drain would be just fine. But to cover their bases, they all felt better about a 3in drain in the shower.

The other option was to have two, 2in drains in the shower, but when it comes time to pour the shower pan you have to deal with weird angles and the tile we’re using wouldn’t sit right. So we looked into linear drains, and actually found a company called Quality Bath (meh on the name, super jazzed about their customer service) that makes a linear drain that is customizable for different installations. Meaning, you can add an extra drain and the drain holes can be moved to wherever you need them!

We ordered the drain and paid for expedited shipping to get it here ASAP. We decided to put the drain just inside the shower threshold so it’s mostly out of site, and that will allow the shower pan to be straight from wall to wall, angling slightly downward toward the drain. We’re so happy with this solution and can’t wait to see how it looks.

This week was heavy in decisions, but so much progress. The electrical gets finished tomorrow, the shower pan will be poured in the next couple days, and we’ve heard rumors of sheetrock by end of week. Most of the surprises are out of the way (knock on wood) and we’re just so excited to watch everything come back together over the next few weeks.

Check out Week 1 progress here.
And the Bathroom Mood Board here!

SaveSave

Home Improvement Ideas For Making Your Home Healthier

Considering the fact that your house is where you and your family spend the most amount of time, it makes sense that you would want your home to be as healthy as it could possibly be, right?

While many people may neglect home improvements that can make them less at risk for health concerns, you would be wise to avoid making the same mistake. There are a number of steps that you can take to make the interior of your home a healthier environment for you and your family members.

Here are a few home improvement ideas for making your home :

Improve The Air Quality

Poor air quality can be harmful for you, not to mention that it makes it easier to trigger things such as asthma or other allergies.

This is why you want the air in your home to be as healthy to breathe as possible, and there are a handful of simple steps you can take to ensure that it is, including:

  • Have the quality of your air actually tested by a professional
  • Keep the windows open when you’re repainting or remodeling for proper ventilation
  • Install air purifiers and dehumidifiers (especially in the basement)

Replace Your Windows

Old windows can cause draft to get into your home, which greatly lowers the temperature and can make common colds more likely (not to mention it can cause your energy costs to go up). Children, in particular, are more susceptible to common colds, particularly during the window.

Simply replacing your windows and then installing to regulate sunlight (the UV rays from excessive sunlight ruin your furniture) will be a wise investment of your time and money.

Install A Water Filter

It’s surprisingly easy for tap water to become contaminated with things such as chlorine, pesticides, or lead. This is why if your family drinks tap water, you need to make sure it’s fully safe for consumption.

One of the most surefire ways to ensure that your tap water is always safe to drink will be to install a water filter, which are actually rather affordable to buy and easy to use.

Inspect/Replace Your Insulation

A home that is not properly insulated can result in a wide variety of issues, including unbalanced temperature, air leakages, and drafts. Not only can this result in your family being more vulnerable to common colds, it can also make mold growth and pest invasion more likely.

Both mold growth and the presence of pests can cause a variety of healthy issues, including skin irritation, headaches, or asthma attacks.

If you suspect or know that your home is not properly insulated, the best course of action will be to have it inspected by a professional, who can then present possible solutions to you.

Making Your Home Healthier

Each of these steps we have covered may seem rather basic, but they can go to making your house a safer and healthier place to live in.

Benefits Of Hiring REO Kitchen Renovation Company

Kitchen – a special area of every house where you experiment with delicacies. Many consider it as “the soul of a home”. Read Article to know more kitchen renovation ideas.

Written by: Krishna Kanhvanshi

Things To Consider Before Kitchen Renovation

Kitchen renovation has become a common thing these days. Since this is a matter of huge investment, there are some crucial aspects that need to be considered for a successful renovation. So make a proper plan to make a successful kitchen renovation.

Written by: Ms Ciara Roche

Kitchen Renovation Cost Depends Upon Your Decision Making

For getting the answer to this question or the getting the right Kitchen renovation cost you yourself have to estimate the approximate cost. Your wishlist will help you to get an approximate estimate of the cost to remodel and renovate your kitchen.

Written by: Danniel Alex Paul