The Secret to Saving Big on Your Kitchen Renovation, According to an Interior Designer

Kitchen Cabinet Renovation (Before)

Before you scroll to see this breathtaking kitchen renovation, check out the before shot to see just how much of an impact the changes made to this space. One of Bek’s best-kept tips to saving cash is to do as much of the work yourself and leave more difficult projects, like honing the counters, to the pros. 

Extend the Kitchen Cabinet Height (After)

If your cabinets are old, chances are that they are on the shorter end. Instead of stripping them, save them and simply extend them upward like Bek did. Now the cabinets are more substantial—and have more room for pantry essentials. Check out Bek’s Pinterest for more info on how she renovated the cabinets.

Work With What You Have (After)

Bek’s kitchen once had dark, dated, glossy granite counters. Replacing them would have cost around $12,000, which was out of the question. Instead, Bek perused Pinterest for kitchens with similar counters for inspiration. After an exhaustive search, she discovered a creative solution for her counters—honing them on-site. This process involves a master craftsman wet sanding down the granite in layers. So after two days, for just under $2,000, her counters turned into beautiful matte granite that looks like soapstone.

Play with Open Shelving

While Bek didn’t replace her existing cabinets—she advises to simply paint and extend them to stretch your dollar. Mix it up and add a wall or two of open shelves. Display your prettiest dishes, pieces of art to add pops of color, and create visual interest vertically.

Source

http://realsimple.com/home-organizing/interior-design-kitchen-hacks

The Complete Kitchen Renovation Budget

The Complete Kitchen Renovation Budget - roomfortuesday.comIf you’re not into budgeting or think the numbers behind a renovation is boring, here’s your cue to skip this one! No hard feelings, because I know it’s not for everyone, but this post was requested numerous times- so I definitely thought it was worth sharing. If you’re interested to see the budget breakdown for my kitchen, click through for the itemized list. 

*Spoiler alert… if you haven’t already browsed through the kitchen reveal, go check that out right here before reading this post!

Hopefully budgeting posts are helpful and shed light on how much certain things cost if you’re considering renovating. Of course costs vary depending on your location and home, but this is what our kitchen reno budget ended up looking like (we live in Salt Lake City, UT). Let’s get to it! Our kitchen is 168 square feet, to give you a reference for size.

I also need to mention that our home was built-in the 1950s and was totally neglected (see before images here), so it needed a LOT of love. We had to replace the subfloor, drywall, add insulation, have our electrical service updated (for a hefty chunk of change), and other miscellaneous items that were part of the territory for this specific, dated, and abused house. If you have a newer home, you won’t have to worry about those items when renovating.

Here’s the breakdown on the number crunching…

Appliances:

Plumbing Fixtures:

Countertop:

  • Fabrication – $2,025

Cabinetry:

  • Custom Cabinetry + Millwork – $30,000

Building Materials:

  • Lumber, Drywall, Insulation, Nails, etc. – $1,700
  • Paint + Primer -$325
  • Electrical & Plumbing Materials – $2,000

Lighting:

  • Recessed Can Lights -$300
  • Electrical Service Upgraded 60 Amps to 150 Amps (required by inspector for our old home) – $7,000

Tile:

  • Other Items (grout, mortar, sealant, etc) – $500

Windows:

  • Large Window Behind Breakfast Nook – $1,600
  • Small Window Above Sink – $450
  • Window Treatment / Roman Shade – $164

Inspections:

  • Permits and Inspections – $275

Labor:

  • Obviously we did all the labor ourselves, so that cost was our time spent working on the kitchen (~15 hours each week over the course of six months), rather than a dollar amount. Emmett estimated about $9,000 – $12,000 in labor… I didn’t include this in the total amount below.

TOTAL= $65,141

Although part of my job is working with brands I love, we honestly paid for the majority of the kitchen out of pocket. We always go into a renovation expecting to pay for the entire thing ourselves, that way we budget accordingly. After that, any contracts I sign for promotional content is an added bonus… it essentially goes toward my salary for living expenses, etc.

I actually have a post coming up in a week and a half on how to budget for large or expensive renovations, so stay tuned for that! We do A LOT of saving. As always, if you have any questions at all… leave me a comment below! Also remember- every renovation and home is different, this is just what our budget experience looked like this time around.

SaveSave

SaveSave

SaveSave

SaveSave

SaveSave

SaveSave

SaveSaveSaveSaveSaveSaveSaveSave

SaveSave

The post The Complete Kitchen Renovation Budget appeared first on Room For Tuesday.

Source

http://roomfortuesday.com/the-kitchen-budget/

Smiley: Home improvement blues

Since I bet you’re just dying to know what’s going on in my life, I can tell you that we’re in the middle of an extensive renovation project at Maison Smiley.

Our house was built in 1922, so we figured it was probably time for a few improvements. …

For anyone contemplating a similar venture, I can offer a few tips:

  • The people working on the project don’t much like it when you survey their job and tell them, “The Property Brothers didn’t do it that way on HGTV. …”
  • The demolition team has the best job on any construction project. Tearing down a whole room has to be a great way to get rid of your frustrations.
  • The electrician doesn’t especially enjoy being called “Sparky.”
  • You’re in big trouble when your contractor uses the word “unexpected. …”
  • It’s never good to see your plumber getting out his shovel. (I told this to Leo Honeycutt, who added that it’s even worse when he gets out a jackhammer. …) 

Life imitates art

That is, if you consider Reader’s Digest art. …

Kathleen Talmadge adds to our “Kidspeak” series with this very old one from Reader’s Digest:

“My 5-year-old son and I were discussing some of the differences between his childhood and mine.

“I pointed out that when I was young, we didn’t have Nintendo, cellphones, computers or even digital cameras.

“I realized how difficult this was for him to understand when he asked, ‘Did you have fruit?'”

Kathleen says this one reminded her of a true story:

“Teenager to mother: ‘Did you meet Dad on ?’

“Mother: ‘When I was young, we did not have computers.’

“Teen: ‘Then how did you get on the internet?'”

The Big Three

Jack Proffitt, of Lafayette, says, “The recent references to Huey Long in your column reminded me of a story my wife tells about her father, who was an immigrant from Lebanon but a deeply patriotic American.

“She remembers when she was a child pictures of three men were hanging on the living room wall behind the sofa.

“When she was small, she thought they must be relatives, but as she grew older, she realized they were photographs of the Pope, Franklin D. Roosevelt and Gov. Huey P. Long — and she realized these were his heroes, along with the New York Yankees, which he followed daily on the radio in his little restaurant in Houma.”

Special People Dept.

Lucy Curry, of Baton Rouge, celebrated her 90th birthday Friday, July 13.

Those ‘whoops’ moments

Sal Suer, of New Orleans, says he heard a story “about an older gentleman taking video of a family member proposing marriage, only to find out he had the camera turned around and he was actually videoing himself.

He says this “brought back memories of a good laugh we had from the 1984 world’s fair in New Orleans, when I took pictures for a good 45 minutes, only to find out at home that I had no film in the camera.

“If we did not laugh once in a while, there would be something wrong with us, and missing life’s roller coaster.

“Then again, I was the one who put yeast on TOP of the loaf to make French bread…”

Helpful hint

Jerry Schexnayder, of Baton Rouge, tells the gentleman looking for bacon seeds for his garden to look in the grocery store, where they’re sold as “bacon bits.”

(I would really love to see Jerry’s garden. …)

Educational experience

Harry Clark, of Lafayette, says, “Tom Boone’s story about endless questions (from kids) reminded me of the time Boudreaux took T-Boy fishing.

“After they got out on the lake and settled in, T-Boy says, ‘Daddy, why is the sky so blue?’

“‘I don’t know, son.’

“T-boy says, ‘Why are some of those birds flying around and some of them are setting in the trees?’

“‘I don’t know, son.’

“’Daddy, why does the wind blow hard for a while and then stop for a while?’

“‘I don’t know, son.’

“’Daddy, do you mind me asking all these questions?’

“‘Why, no, son; how else you ever going to learn anything?'”

Source

https://www.theadvocate.com/baton_rouge/entertainment_life/smiley_anders/article_8d0e058c-861c-11e8-a9f9-87b6929e8b8f.html

7 Killer Ideas For A Home Improvement Business

As time goes by, many people realize that they do not need a 9 to 5 job to make a sustainable income and that they can set up offices in their own homes. You can be your own boss with a little effort and a working strategy. Some people work online to achieve this, but have you ever thought about starting a home improvement business? Home improvement is a perfect business venture if you are well acquainted with the ins and outs of home repair and facelifts or a certain part of it.

All you really need to set up a successful home improvement business is to be handy about one or more aspect of home improvement and take total advantage of it. Likewise, you can hire or go into partnership with someone who knows the business you have in mind.

Check out these killer ideas for home improvement, who knows, you might just get

  1. Home cleaning business
    Home cleaning is not restricted to reality shows like How Clean Is Your House. So long as you are meticulous and crazy about transforming stained sinks into see-through glasses, you will not lack customers. You do not require much capital to start a cleaning service, plus it’s pretty lucrative if you’re doing a good job. It’s one of those businesses where clients just cannot help referring others to you. You can also easily branch out into commercial cleaning such as cleaning offices or vacated apartments. Placing adverts on dailies or launching a blog that invites local home-owners, is a great way to start marketing yourself.
  2. Appliance repair
    If you’re that nerdy mom or a skilled stay-at-home dad, you could start to repair home appliances for your neighbours and before you know it, you have a fully-fledged business on your hands. People don’t like to buy new things just because the old ones are having glitches—well unless they are loaded. If you are a genius at prolonging expiry dates of fridges and blenders and vacuums, then you are open for business. The sweet part is, you can charge three times the minimum wage an hour for these services. Generally, people call air condition service when the central air condition breaks down, and they break down a lot. The thing is, those gentlemen can take their time. If you can fix your own air condition, chances are that you can fix somebody else’s. Why not polish your skills and give the lazy air condition service a run for their money?
  3. Polishing and painting
    One of the easiest but highly profitable home improvement business ideas is polishing furniture and painting around the house. Furniture and wooden surfaces usually become dull after a while and lots of people will be quite willing to have them polished sprayed. Not everybody can pick up a brush and paint and re-paint the walls around the house either; this is where you come in. You will require some skills to paint walls and polish furniture—why do you think lots of people can’t do it? However, a few months of training should set you up
  4. Water pipes and drainage repair
    You may not know just how many times water pipes and drainage systems burst in homes, but this is common. Toilets and sinks are also jamming on a daily basis and it takes some waiting just to get a plumbing company to come and take a look. If you have a plumbing background and you can fix jammed sinks blindfolded, then you are sitting on very lucrative skills. You can get paid $70 and above an hour just to get the toilet to flush again.
  5. Gardening and trimming service
    If you are crazy about gardening and sticking your hands into the dirt, you can turn it into a full-time business venture. You do not need much experience either to become a home-based gardener. An upside to this business is that there will always be a demand for gardening services which include pruning, watering, planting, decorating, trimming, etc. You can easily secure regular clients, and you can earn decent wages an hour. If you possess a degree, however, in landscaping, you can earn even more in redesigning gardens and outdoors to suit the needs of your clients.

    Once you land a home improvement business idea, learn all you can about it and try to find out if your local government has some legal requirements you must fulfill. As we have established, almost all the business ideas listed above require little capital to get them up and running. Get the documentation you need—you don’t want start on the wrong side of the law—and jump right in, who knows, this might just be the breakthrough you always wanted.

    How to shine in media spotlight… Have you ever been caught off guard at work by an unexpected media inquiry? The emergency request from your…

    @MCKINSEY INSIGHTS

    • For countries that want to provide universal health coverage, defining the benefits package can be challenging. An analytical framework provides insights and action steps for emerging economies.

    ▼ @BC360° FREESOURCES SELECTED FOR YOU ▼

    Think Green When Planning A Home Improvement Project

    When it comes to home improvement, many cost-conscious homeowners think about all of the “green” they will spend. Today, however, they also are able to think about a different kind of green – “green” building.
    With soaring energy prices and states adopting regulations that prohibit products that emit harmful fumes, environmentally friendly building has become a hot topic. In fact, organizations such as the U.S. Green Building Council have been formed to establish criteria for incorporating green products and materials into homes.
    Here are a few green products or projects to consider.
    * Leaky ducts can account for 30 percent or more of wasted energy. Caulking around your doors, windows, moldings, baseboards and vents is an easy and inexpensive project. Choose a high-quality product that complies with regulations governing volatile organic compounds, or VOCs, which are ozone-damaging pollutants. For example,
    Polyseamseal All-Purpose Adhesive Caulk has a VOC level of 3 percent and provides a paintable, fast-drying, long-lasting seal. For more information, visit www.polyseamseal.com.
    * Ready to add on to that beautiful deck? Need to do some minor repairs? When selecting an adhesive for the job, be sure to choose one that is easy and safe to use, such as Loctite Exterior Power Grab construction adhesive.
    The latex-based formula emits no VOCs and has an initial tack that is nine times stronger than traditional construction adhesives. Plus, it is easy to work with for interior applications because it has low odor, is paintable and can be cleaned up with water. For more information on Loctite brand products, visit www.loctiteproducts .com.
    * Are you ready to replace your siding? When choosing your siding material, consider the insulation value and the amount of maintenance it requires. Natural cedar siding, for instance, may seem to be a “green” choice, but it has a low insulation value and requires regular painting; thus, it may not be the best choice.
    Insulated vinyl siding, such as CraneBoard Solid Core Siding, is an energy efficient solution. It features a foam backing and provides better insulation than wood, fiber cement or traditional vinyl siding. For more information, visit www.cranesiding.com.
    * One of the most obvious ways to make any home more environmentally friendly is to use less electricity. The biggest electricity-eaters are appliances and lighting. Buy Energy Star appliances and switch incandescent bulbs with compact fluorescent bulbs to quickly reduce electricity demand.
    Word count: 393

    Source

    http://plrplr.com/25982/think-green-when-planning-a-home-improvement-project/

    How to install hardware like a pro – IKEA kitchen renovation

    Are you ready for more IKEA kitchen posts? I’m determined to finish this kitchen once and for all! Today I’m back to share all about our kitchen hardware – where we purchased it and the best way to install it.

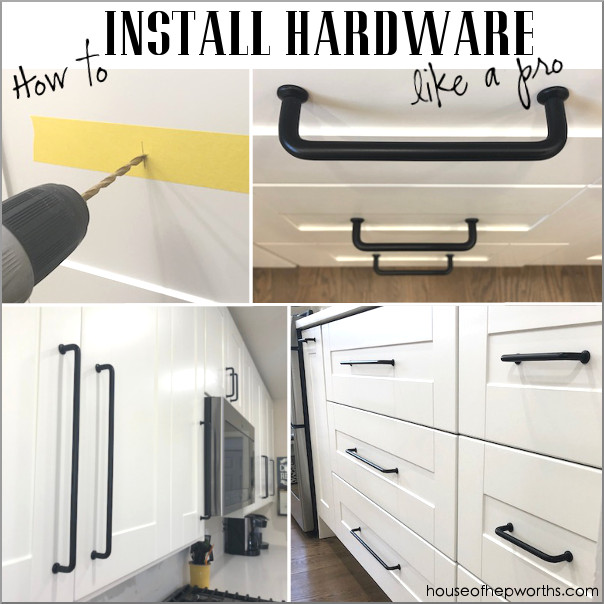
    Our hardware is from IKEA (surprise, surprise!). I shopped around for other options, but I really fell in love with this hardware from IKEA. It’s called Bagganas and comes in a few colors; black, stainless steel, and gold. It also comes in two lengths; 5 5/8″ and 13 3/16″.

    I love love LOVE this hardware. I still can’t believe it’s from IKEA. They have come a long way in their hardware department. I love the color, texture, and versatility of this hardware. Did you know you can install it with or without the little round washers on the ends? It totally changes the look depending on if you install with or without those washers.

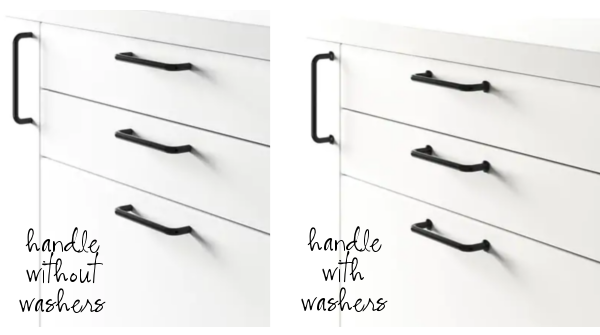
    We chose to install with. I feel like it softens up the hardware just a bit.

    Instead of choosing a one-size-fits-all approach, I opted for different sizes of handles depending on the door size and style. For any tall upper cabinets or wide lower drawers, I chose the longer handle. For shorter uppers or narrow drawers I opted for the shorter handle.

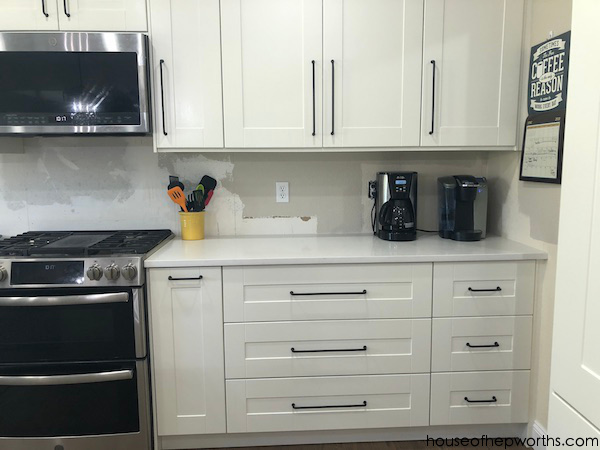
    The pull-out spice racks were tricky and I went back and forth on them for quite awhile. I wanted to install them a little lower, but the width of the handle didn’t work well. In the end I installed them horizontally at the top of the drawer and am happy with this decision.

    All of our lower drawers I installed the hardware dead-center. I love the look of the hardware sitting in the center of a drawer. In retrospect I’m glad I did it this way because my kids prefer to open the drawers with their feet! If I had installed the handles at the top of each drawer I feel like it would have compromised the integrity of the drawer over time.

    The main feet-opening drawers are the pantry drawers (below). Also, I opted for the long handles on the pantry doors and I can honestly say that I love the placement of them. I don’t regret a single handle placement. I feel like choosing a variety of sizes of handles as well as centering the handles on the drawers makes the kitchen look and feel even more custom.

    So how did I install them? I chose a method that takes a little longer than using a template, but I feel that by doing so I made sure that each and every handle was 100% perfect. Here’s how I installed them:

    I started by using some Frog Tape for delicate surfaces. I placed the tape in the general area that I wanted the handle. Using a flexible tape measure for sewing (like this one), I marked the center of the drawer on the tape with a pencil. Then I marked exactly where each screw hole needed to be drilled. To make sure they were level, I actually didn’t use a level – I measured down from the top of each drawer. This way they are level with the top of the drawer, not the floor.

    Next, here’s a little trick I came up with. I’ve installed hardware before and I feel like the drill bit slips a little sometimes and makes your hole off-center. Before drilling I used a small nail and a hammer and gently tapped the nail exactly into the center of where I want to drill.

    Now my drill bit will have a center spot to sink into ensuring my hole is exactly center. I used a drill bit that was the same size as the directions that came with the hardware said to use.

    I did this for each hole. Notice my tape isn’t level. The tape is only there to mark on with your pencil so you don’t draw all over your cabinets.

    Once your holes are drilled, peel off the tape.

    Because these drawers are IKEA and are a particle board type material with a thick plastic-type coating on top, as I drilled the coating tended to leave a little behind:

    To remedy this I would use a small utility knife to carefully cut the excess material away, leaving a flat clean hole for the hardware.

    And now, the best part – attaching the new handles. Each handle has two screws that insert from inside the cabinet. They screw into the handles.

    These handles are so clean and classic looking. They aren’t busy but add a nice touch to the finished kitchen.

    We obviously need to do all the finish details still (toe kicks, crown, etc), but aside from that, now that the hardware is attached this kitchen is looking so much more finished.

    I really am digging the mix of long and short handles. I’m glad I went out of my comfort zone and tried mixing sizes. I feel like it really paid off.

    I installed most of the hardware between having our countertops templated and having them installed. Here’s my post all about purchasing countertops through IKEA and then having them installed.

    And now, a few more pictures of the hardware after the final countertop installation.

    You can see from this island picture which handles open drawers (horizontal hardware) versus which handles open doors (vertical hardware). The one centered handle in the middle is a pull-out garbage can.

    The one cabinet with the double doors is our only actual lower cabinet in the kitchen. The rest are drawers, a lazy susan, or an appliance lift.

    This main thoroughfare view through our kitchen never gets old. It’s my favorite view because it really showcases the different sizes of hardware.

    Another pantry shot:

    Our one wall of uppers.

    As you walk into the kitchen from the mud and laundry room, this is the view:

    Our fridge used to be here as you walked into the kitchen. I hated that you had to walk past people trying to get into the fridge while you came in and out of the house. We moved our fridge to the pantry wall and now this old spot is our coffee area.

    So there you have it! Everything you ever wanted to know about IKEA’s Bagganas hardware and the best way to install it. Yes, you can buy guides that help with installation, but I’ve used them before and am never 100% happy with every door. Taking your time and doing one drawer at a time with a tape measure really is the best way to go to ensure a perfect fit.

    Here are all the posts in our IKEA kitchen series:

    Start at the VERY beginning of our WHOLE-HOUSE renovation:
    New to this series? Click here to start at the beginning!


    Instagram || Facebook || Pinterest || Youtube

    This post contains amazon affiliate links

    Thanks for reading! Have a wonderful week!

    Source

    http://www.houseofhepworths.com/2018/07/13/how-to-install-hardware-like-a-pro-ikea-kitchen-renovation/